
Soft Sourdough Sandwich Bread
Prep Time: 30 minutes
Cook Time: 40–45 minutes
Rise Time: Approximately 8–12 hours
Cooling Time: 2 hours
Total Time: Approximately 11–15 hours, excluding starter preparation
Yield: 2 loaves, approximately 16 slices each
Pan Size: Two 9 × 5-inch loaf pans
Soft Sourdough Sandwich Bread has a tender crumb, a golden crust, and a gentle sourdough flavor. Butter and a little honey soften the dough, creating bread that slices neatly for sandwiches, toast, and grilled cheese.
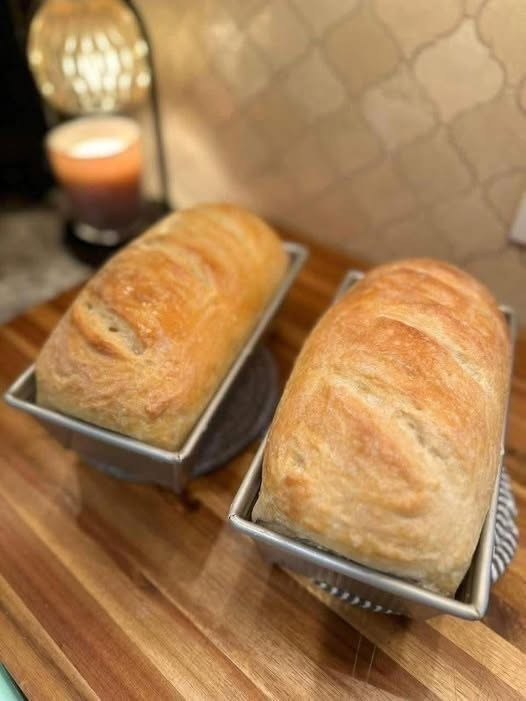
Inspired by the loaves in your photo, this recipe makes two generously sized sandwich loaves using an active sourdough starter. The original recipe cannot be determined from the image, but this version is designed to produce a similar homemade loaf with a soft interior.
There is no commercial yeast in the dough. Your starter provides the rise, so fermentation times depend on its strength and the temperature of your kitchen. Watch the dough’s appearance as closely as the clock.
Ingredients for Soft Sourdough Sandwich Bread
200 g active sourdough starter, at 100% hydration
550 g lukewarm water
50 g honey
1,000 g bread flour
20 g fine salt
80 g unsalted butter, softened
Extra butter for greasing the pans and brushing the baked loaves
A 100% hydration starter contains equal weights of flour and water. Feed your starter ahead of time and use it when it has risen well, looks bubbly, and is near its peak.
For consistent results, weigh the ingredients with a kitchen scale. Cup measurements can introduce enough extra flour to make sandwich bread noticeably dense.
Instructions for Soft Sourdough Sandwich Bread
Step 1: Prepare the starter
Feed your sourdough starter so it is active when you begin mixing. Depending on your feeding ratio and room temperature, this may take approximately 4–8 hours.
Look for a starter that has roughly doubled, contains bubbles throughout, and has a pleasantly fermented aroma. A weak or recently unfed starter can make this enriched dough rise very slowly.
Measure out 200 g for the recipe, keeping some starter aside for future baking.
Step 2: Mix the dough
In a large mixing bowl, stir together the water, active starter, and honey.
Add the bread flour and salt. Mix until no dry flour remains and a rough dough forms. It will feel fairly firm at first.
Cover and let it rest for 20 minutes. This gives the flour time to absorb the water and makes the dough easier to knead.
Step 3: Knead in the butter
Add the softened butter in several small portions, kneading each portion into the dough before adding more.
Knead by hand for approximately 12–15 minutes, or with a suitable stand mixer and dough hook for approximately 8–12 minutes on low to medium-low speed. Follow your mixer’s dough-capacity limits; divide this large batch if necessary.
The dough should become smooth, elastic, and slightly tacky. Stretch a small piece gently: it should form a thin membrane before tearing.
Avoid adding large amounts of extra flour. If the dough feels sticky, pause for a few minutes and continue kneading.
Step 4: Let the dough rise
Transfer the dough to a lightly greased bowl or straight-sided container. Cover so the surface does not dry out.
Let it rise at approximately 75–79°F (24–26°C) for 5–7 hours, or until it has increased in volume by roughly 75–100%. It should look noticeably puffier, with a slightly rounded surface and some bubbles along the sides.
Give it one gentle stretch and fold after the first hour if it feels loose. In a cooler kitchen, the rise may take considerably longer.
Step 5: Divide and rest
Grease two 9 × 5-inch loaf pans with butter.
Turn the dough onto a lightly floured surface and divide it into two equal pieces. Gently form each piece into a loose round without tearing the surface.
Cover and rest for 15 minutes. This short pause relaxes the dough, making it easier to shape without excessive pulling.
Step 6: Shape the loaves
Gently flatten one piece into a rectangle approximately 8 inches wide. Press out any unusually large air pockets while preserving some of the dough’s lightness.
Starting from a short edge, roll it into a snug log. Pinch the seam closed and tuck the ends underneath.
Place the log seam-side down in a prepared pan. Repeat with the second piece. Even shaping encourages an even crumb and helps prevent large tunnels inside the finished bread.
Step 7: Proof in the pans
Cover the pans loosely with lightly greased wrap or another cover that leaves room for expansion.
Let the loaves rise for approximately 3–5 hours at a comfortable room temperature. They are ready when the center of each loaf stands about 1 inch above the pan rim and the dough looks light and puffy.
A gentle fingertip indentation should slowly spring back, leaving a slight impression. If it rebounds immediately, give the dough more time.
Step 8: Bake
Near the end of proofing, preheat the oven to 375°F (190°C) with a rack in the center.
For a appearance similar to the photo, make two or three shallow diagonal slashes with a sharp bread lame immediately before baking. Scoring is optional; unscored sandwich loaves also work.
Bake for 40–45 minutes, until golden brown and the center registers approximately 195–200°F (91–93°C).
If the tops brown too quickly, loosely cover them with foil for the remaining baking time. Leave space between the pans for air circulation.
Step 9: Cool completely
Brush the hot tops lightly with butter for a softer crust.
Let the loaves rest in their pans for 5–10 minutes, then turn them onto a wire rack. Cool for at least 2 hours before slicing.
Cutting while hot can compress the crumb and make the interior seem gummy. Once cool, use a serrated bread knife and a gentle sawing motion.
Tips for Soft Sourdough Sandwich Bread
Use a strong starter. A predictable starter makes fermentation easier to judge.
Keep the butter soft, not hot. Softened butter incorporates more evenly.
Develop the dough thoroughly. Good gluten development supports a tall loaf and a tender, even crumb.
Watch the rise. Sourdough timing changes with temperature and starter activity.
Avoid overproofing. Dough that becomes fragile or begins to collapse may not rise well in the oven.
Do not overbake. Excessive baking can dry out the crumb.
Cool before wrapping. Trapped steam can make the crust damp.
Recipe Notes and Variations For Soft Sourdough Sandwich Bread
Bread flour gives the dough strength and helps it rise tall. Strong all-purpose flour can work, but the dough may feel different and produce a slightly less lofty loaf.
To add whole wheat flour, begin by replacing 100–200 g of the bread flour. Whole wheat absorbs more water, so add a little extra water only if the dough feels excessively stiff.
You can replace the honey with 50 g granulated sugar. The flavor will be slightly different, but the dough will still have a little sweetness.
For one loaf, halve all the ingredients and use one 9 × 5-inch pan. Baking time should remain similar.
Storage and Freezing For Soft Sourdough Sandwich Bread
Once completely cool, store the bread in a bread bag or airtight container at room temperature for 2–3 days. In a hot or humid kitchen, freeze what you will not use promptly.
For longer storage, slice the loaf and freeze the slices in a well-sealed freezer bag for up to 3 months. Separate portions with parchment if desired.
Toast slices directly from frozen, or let them thaw while covered. Refrigeration generally makes bread stale faster, so room-temperature storage or freezing is preferable for texture.
Make Everyday Cooking Easier
Discover 60+ high-protein, low-carb recipes with simple instructions and everyday ingredients. Explore breakfasts, lunches, dinners, salads, and snacks—plus a 30-day meal plan to help you plan ahead.
Get the Elite Protein Kitchen Cookbook
Serving Ideas for Soft Sourdough Sandwich Bread
Use this bread for chicken sandwiches, egg salad, cucumber sandwiches, or grilled cheese. Its even crumb holds spreads well without large holes.
Toast thick slices and serve with butter, jam, or scrambled eggs. Slightly stale slices are useful for French toast, bread pudding, homemade croutons, or breadcrumbs.
Estimated Nutritional Information for Soft Sourdough Sandwich Bread
Per slice, based on 32 slices:
Calories: Approximately 150
Protein: 4 g
Carbohydrates: 27 g
Fat: 2.5 g
Fiber: Approximately 1 g
Sodium: Approximately 245 mg
Values are estimates and exclude extra butter used for greasing and brushing.
Frequently Asked Questions For Soft Sourdough Sandwich Bread
Can I use sourdough discard?
This recipe needs active starter for leavening. Unfed discard is not a reliable direct substitute.
Why is my bread dense?
Common causes include a weak starter, insufficient kneading, or underproofing. Excess flour can also make the dough too stiff.
Will the bread taste very sour?
Usually it has a mild tang, but flavor varies with starter condition, temperature, and fermentation length.
Why is the inside gummy?
The loaf may be underbaked, underfermented, or sliced before cooling. Check the center temperature and allow a complete cooling period.