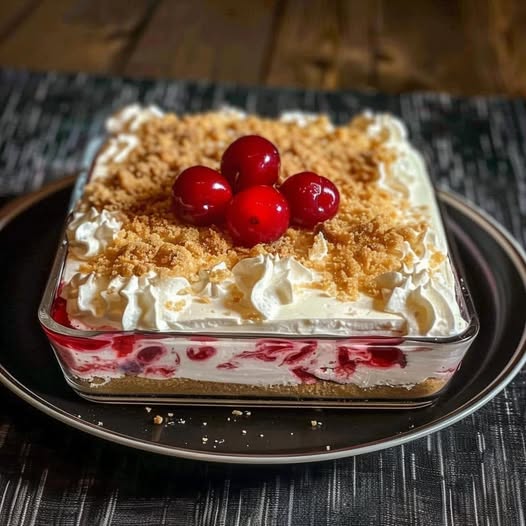

No-Bake Cherry Cheesecake Dessert
Prep Time: 25 minutes
Cook Time: 0 minutes
Chill Time: At least 6 hours, preferably overnight
Total Time: 6 hours 25 minutes
Servings: 12
Pan Size: Deep 8-inch square dish, at least 2½ inches deep
No-bake cherry cheesecake dessert features a buttery graham cracker crust, fluffy cheesecake filling, sweet cherry swirls, and a soft whipped cream topping. Finished with golden crumbs and bright red cherries, it makes a beautiful dessert for family dinners, celebrations, or weekend gatherings.
Inspired by your photo, this version uses cream cheese and freshly whipped cream to create a rich, airy filling without eggs, gelatin, or baking. The cherries add a fruity contrast to the creamy layers, while the crumb base gives each bite a little texture.
Prepare it the evening before serving so the filling has plenty of time to firm up. It has a soft, creamy texture and can be served in chilled squares or scooped into dessert bowls.
Ingredients for no-bake cherry cheesecake dessert
For the graham cracker crust:
1½ cups (180 g) graham cracker crumbs
6 tablespoons (85 g) unsalted butter, melted
2 tablespoons granulated sugar
For the cheesecake filling:
16 ounces (450 g) full-fat block cream cheese, softened
¾ cup (90 g) powdered sugar
1 teaspoon vanilla extract
1 tablespoon lemon juice
1 cup (240 ml) cold heavy whipping cream, preferably 35–36% fat
1½ cups (approximately 400 g) thick cherry pie filling
For the topping:
¾ cup (180 ml) cold heavy whipping cream
2 tablespoons powdered sugar
¼ cup (30 g) graham cracker crumbs
5–6 well-drained maraschino cherries or pitted fresh cherries
Instructions for no-bake cherry cheesecake dessert
Step 1: Prepare the dish
Choose a deep 8-inch square glass dish so the creamy filling and red cherry swirls show through the sides. A 9-inch square dish also works, although the layers will be slightly thinner.
If you want to lift the dessert out before cutting, line the dish with two overlapping strips of parchment paper. Otherwise, assemble it directly in the dish and serve from there.
Step 2: Make the crumb crust
Combine the graham cracker crumbs and granulated sugar in a medium bowl. Pour in the melted butter and stir until the mixture resembles damp sand.
Transfer the mixture to the dish. Press it evenly across the bottom with the back of a spoon or a flat-bottomed measuring cup. Press firmly enough to hold the crumbs together without making the crust overly compact.
Refrigerate for 20–30 minutes while preparing the filling.
Step 3: Beat the cream cheese
Place the softened cream cheese in a large mixing bowl. Beat with an electric mixer for approximately 2 minutes, until smooth.
Add the powdered sugar, vanilla extract, and lemon juice. Beat again until completely combined, scraping down the sides and bottom of the bowl.
Check the mixture for lumps before continuing. Cream cheese that is still cold can remain lumpy even after the whipped cream is added.
Step 4: Whip the cream for the filling
In a separate bowl, whip 1 cup cold heavy cream until stiff peaks form. The cream should hold its shape when the beaters are lifted, but it should still look smooth.
Stop before it becomes grainy. Overwhipped cream is harder to fold evenly into the cheesecake mixture.
Using a spatula, fold the whipped cream into the cream cheese mixture in two additions. Use gentle movements to preserve the air that gives the filling its light texture.
Step 5: Add the cheesecake and cherry layers
Spread half the cheesecake filling over the chilled crust.
Spoon half the cherry pie filling over it in small dollops. Add the remaining cheesecake mixture, spreading it carefully so the layers remain mostly separate.
Dollop the remaining cherry filling over the surface. Draw a butter knife through the upper layers two or three times to create loose cherry swirls. Keep the knife above the crumb crust.
Avoid excessive mixing, which will turn the filling pink and reduce the distinct red-and-white appearance.
Step 6: Chill until firm
Cover the dish without touching the surface and refrigerate for at least 6 hours, preferably overnight.
The chilling time is essential: the cream cheese and whipped cream need time to firm up around the fruit filling. This dessert will remain softer than a baked cheesecake, but it should hold chilled portions when prepared with the recommended ingredients.
Step 7: Prepare the whipped topping
Shortly before serving, whip the remaining ¾ cup heavy cream with 2 tablespoons powdered sugar until medium-stiff peaks form.
Spread most of the whipped cream over the chilled dessert. If desired, reserve a little in a piping bag and pipe small peaks around the edges.
Adding this fresh topping near serving time helps it maintain its best appearance.
Step 8: Decorate and serve
Sprinkle the graham cracker crumbs over the whipped cream. Arrange the drained cherries in the center.
For neater portions, use a sharp knife dipped in warm water and wiped dry between cuts. Lift each portion with a small spatula and serve immediately.
If you prefer a more relaxed presentation, spoon the dessert into bowls, making sure each serving includes some crust, cheesecake filling, cherries, and cream.
Tips for the Best Results for no-bake cherry cheesecake dessert
Use block cream cheese. Spreadable cream cheese from a tub can contain more moisture and may produce a softer filling.
Keep the whipping cream cold. Cold cream whips more reliably and holds its structure better.
Choose thick cherry filling. Thin cherry sauce can loosen the cheesecake layers.
Cool homemade filling completely. Warm fruit filling can melt the whipped cream and soften the crust.
Do not shorten the chilling time. Overnight refrigeration gives the most dependable texture.
Drain garnish cherries well. Pat them dry to prevent red syrup from running across the topping.
Add crumbs just before serving. They gradually absorb moisture and lose their crispness.
Ingredient Notes and Variations for no-bake cherry cheesecake dessert
Digestive biscuits can replace the graham crackers. Use the same weight of crumbs and omit the crust sugar if the biscuits are already sweet enough for your taste.
For a slightly different flavor, replace the cherry pie filling with an equally thick blueberry or strawberry pie filling. Avoid substituting plain fruit juice or a runny compote.
You can also assemble the dessert in individual glasses. Divide the crust mixture among the glasses, then add the cheesecake mixture and cherry filling. Individual portions are convenient for entertaining and do not need to hold a cut edge.
For a smaller batch, halve the ingredients and use a loaf pan. Keep the same chilling time.
Storage and Make-Ahead Instructions for no-bake cherry cheesecake dessert
Cover and refrigerate leftovers for up to 3 days. Keep the dessert chilled until serving, and return leftovers to the refrigerator promptly.
For make-ahead preparation, assemble the crust, cheesecake filling, and cherry layers the day before. Add the whipped topping, crumbs, and garnish cherries on the day you plan to serve it.
You can freeze the dessert without the fresh topping for up to 1 month for best quality. Wrap it securely and thaw overnight in the refrigerator. The cherry filling may release a little moisture after thawing, so refrigeration is preferable when preparing it only a day ahead.
Serving Ideas for no-bake cherry cheesecake dessert
Serve small chilled squares after a hearty meal, or offer individual dessert glasses at a party. Unsweetened tea or coffee pairs well with the sweet filling.
For a simple presentation that matches the photo, place the glass dish on a dark serving platter and decorate with a small central cluster of cherries. The visible layers provide plenty of color without elaborate decorations.
Make Everyday Cooking Easier
Discover 60+ high-protein, low-carb recipes with simple instructions and everyday ingredients. Explore breakfasts, lunches, dinners, salads, and snacks—plus a 30-day meal plan to help you plan ahead.
Get the Elite Protein Kitchen Cookbook
Estimated Nutritional Information for no-bake cherry cheesecake dessert
Per serving, based on 12 servings:
Calories: Approximately 445
Protein: 4 g
Carbohydrates: 38 g
Fat: 31 g
Saturated Fat: 19 g
Fiber: Approximately 1 g
Values are estimates and will vary with the cream cheese, biscuits, cherry filling, and portion sizes used.
Frequently Asked Questions for no-bake cherry cheesecake dessert
Why is my cheesecake filling too soft?
Common causes include using spreadable cream cheese, underwhipping the cream, adding thin cherry sauce, or not chilling the dessert long enough.
Can I use fresh cherries instead of pie filling?
Fresh cherries alone will not create the same thick cherry swirls. Use them as a garnish, or cook them into a thick filling and cool it completely before assembling.
Does this recipe need gelatin?
No. Full-fat block cream cheese, properly whipped heavy cream, and thorough chilling provide the structure for this soft cheesecake dessert.
Can I make it without an electric mixer?
Yes, but whipping the cream and beating the cream cheese until smooth will take more effort. Use a sturdy whisk and ensure the cream cheese is softened.




Pingback: chocolate caramel nut bars2026