
No-Knead Garlic Herb Homemade Bread
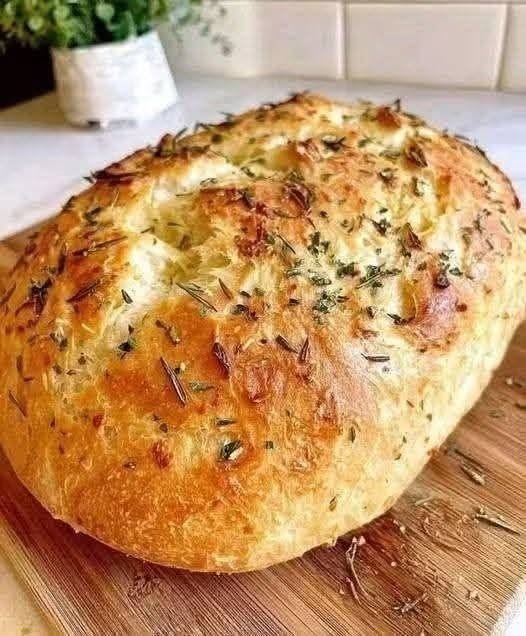
I don’t buy bread anymore! This incredibly easy homemade bread requires no kneading, no eggs, and no butter. With just a few inexpensive pantry ingredients, you can make a beautiful golden loaf with a crisp crust, soft fluffy center, and delicious garlic-herb flavor.
The secret is the long resting time. Instead of kneading the dough, you simply mix the ingredients together, let the dough rise, shape it gently, and bake it in a hot oven. The result is rustic bakery-style bread without expensive equipment or complicated techniques.
Fresh garlic, rosemary, and herbs add wonderful flavor to the crust, while olive oil gives the bread a delicate richness without using butter. It’s perfect alongside soups, pasta, salads, roasted vegetables, or eggs, or simply sliced warm and served with olive oil.
Ingredients
For the Bread
- 3 cups all-purpose flour
- 1 1/2 teaspoons salt
- 1 teaspoon granulated sugar
- 1 teaspoon instant yeast
- 1 1/2 cups warm water
- 1 tablespoon olive oil
- 2 cloves garlic, finely minced
- 1 teaspoon dried rosemary
- 1 teaspoon dried thyme
- 1 tablespoon chopped fresh parsley, optional
For the Topping
- 1 tablespoon olive oil
- 1 small clove of garlic, finely minced
- 1/2 teaspoon dried rosemary
- 1/2 teaspoon dried thyme
- A small pinch of coarse salt
Instructions
1. Mix the Dry Ingredients
Add the flour, salt, sugar, and instant yeast to a large mixing bowl.
Whisk or stir everything together until the ingredients are evenly distributed.
The sugar is optional, but a small amount can help support yeast activity and add a subtle balance to the flavor.
2. Add the Garlic and Herbs
Add the minced garlic, rosemary, thyme, and fresh parsley if using.
Stir them into the flour mixture.
Fresh garlic gives the bread a stronger flavor, while dried herbs are convenient and distribute beautifully throughout the dough.
3. Add the Water
Slowly pour the warm water into the flour mixture while stirring with a wooden spoon or sturdy spatula.
Add the olive oil and continue mixing until a rough, sticky dough forms.
The dough should look shaggy and somewhat wet. Don’t add large amounts of extra flour simply because the dough feels sticky.
A wetter dough is one of the reasons this no-knead bread develops such a lovely texture.
4. No Kneading Required
This is the easiest part of the recipe.
You do not need to knead the dough.
Once there are no large pockets of dry flour remaining, cover the bowl tightly with plastic wrap, a reusable cover, or a clean kitchen towel.
Let the dough rest at room temperature for approximately 8–12 hours.
Overnight is especially convenient. Mix the dough before bed and bake it the following morning.
During this resting period, the yeast slowly develops flavor and creates air bubbles throughout the dough, replacing the need for traditional kneading.
5. Check the Dough
After the resting period, the dough should look noticeably larger, bubbly, and airy.
You may see small bubbles across the surface.
This is exactly what you want.
If your kitchen is particularly cold, the dough may need additional time. Give it another hour or two if it has not visibly expanded.
6. Prepare Your Work Surface
Lightly flour a clean work surface.
Carefully scrape the dough out of the bowl.
Because the dough is sticky, use a dough scraper or lightly floured hands if necessary.
Do not aggressively knead it.
Gently fold the edges of the dough toward the center several times to create a loose round shape.
7. Shape the Loaf
Turn the dough so the smoother side is facing upward.
Gently shape it into a round loaf.
You don’t need to make it perfect. The rustic appearance is part of the charm of homemade no-knead bread.
Place the dough on a piece of parchment paper or a lightly floured surface.
Cover it loosely and let it rest for another 30–45 minutes.
8. Prepare the Herb Topping
While the dough is resting, combine the olive oil, minced garlic, rosemary, thyme, and a small pinch of salt.
Mix well.
This mixture will create a flavorful golden topping as the bread bakes.
9. Preheat the Oven
Place a Dutch oven or heavy oven-safe pot with a lid into the oven.
Preheat the oven to 450°F (230°C).
Allow the Dutch oven to heat for approximately 30 minutes.
Preheating the baking vessel is important because the intense heat helps the bread develop its crisp crust and encourages a beautiful rise.
10. Prepare the Bread
Carefully brush the top of the dough with the garlic-herb olive oil mixture.
If desired, make one or two shallow cuts across the top using a sharp knife.
These cuts allow the bread to expand during baking and also give it a beautiful rustic bakery-style appearance.
11. Bake the Bread
Very carefully remove the hot Dutch oven from the oven.
Lift the dough using the parchment paper and place it into the hot pot.
Cover with the lid.
Bake covered for approximately 25 minutes.
The covered environment traps steam, which helps create the characteristic crisp crust.
12. Finish Baking Uncovered
Remove the lid and continue baking for another 15–20 minutes.
The bread should become deeply golden brown on top.
If you prefer a lighter crust, check it earlier.
For the beautiful golden, rustic appearance shown in the photo, allow the crust to become well browned.
13. Cool Completely
Carefully remove the bread from the Dutch oven.
Place it on a wire rack and allow it to cool for at least 30–45 minutes before slicing.
Although it can be tempting to cut into the loaf immediately, allowing it to cool gives the interior time to finish setting.
Cutting it too early can make the center appear gummy.
Once cooled slightly, slice and serve.
Notes
The dough should be sticky. This is normal for no-knead bread and helps create a soft, airy interior.
The water should be warm rather than hot. Very hot water can damage the yeast.
If using active dry yeast instead of instant yeast, allow the yeast to sit in the warm water with the sugar for approximately 5–10 minutes before mixing.
The exact amount of water can vary slightly depending on your flour and humidity. If the dough is extremely dry, add a tablespoon of water at a time.
If the dough is extremely wet, resist adding lots of flour. A small amount of flour on your hands or work surface is usually enough to handle it.
For the best crust, bake the bread in a preheated Dutch oven or heavy pot with a lid.
Tips for Perfect No-Knead Bread
Use fresh yeast. Old or inactive yeast may prevent the dough from rising properly.
Don’t rush the first rise. The long fermentation is what gives this bread its flavor and airy texture.
Don’t overwork the dough. One of the biggest advantages of this recipe is that you don’t need traditional kneading.
Preheat your Dutch oven. A hot baking vessel creates the intense heat necessary for a beautiful crust.
Be careful with the hot pot. Dutch ovens become extremely hot, so always use oven mitts.
Don’t slice immediately. Give the loaf time to cool so the interior can set properly.
Use parchment paper. It makes transferring the sticky dough into the hot pot much easier.
Watch the garlic. Fresh garlic on the surface can brown quickly. If your oven runs hot, check the bread during the final baking stage.
Can I Make This Without Herbs?
Absolutely.
For a simple classic loaf, leave out the garlic and herbs and bake the basic dough.
You can also customize the bread with:
- Dried oregano
- Basil
- Chives
- Rosemary
- Thyme
- Everything bagel seasoning
- Cracked black pepper
- Grated Parmesan
- Sesame seeds
- Sunflower seeds
Garlic Parmesan Version
For an extra savory loaf, add 1/4 cup finely grated Parmesan cheese to the dough.
Brush the top with olive oil and garlic before baking, then sprinkle a little additional Parmesan over the surface during the final few minutes of baking.
Cheese-Stuffed Version
For a special occasion, gently flatten the dough before shaping and add shredded mozzarella or cheddar to the center.
Fold the dough around the cheese and seal it carefully before allowing it to rest.
The result is a rustic homemade loaf with a delicious melted cheese center.
Servings
1 large loaf
Approximately 10–12 slices, depending on how thickly you slice the bread.
Nutritional Information
Approximate nutrition per slice when divided into 12 slices:
Calories: 155
Protein: 4 g
Carbohydrates: 28 g
Fat: 3 g
Fiber: 1 g
Sugar: 1 g
Sodium: 295 mg
Nutritional values are estimates and will vary depending on the flour, olive oil, serving size, and other ingredients used.
Benefits
Simple Ingredients
This bread uses basic pantry staples that are inexpensive and easy to find. You don’t need eggs, butter, or specialty ingredients.
No Kneading
The long fermentation process does the work for you, making this a great recipe for beginners.
No Eggs
The recipe is naturally egg-free, making it useful when you don’t have eggs available or prefer bread without them.
No Butter
Olive oil provides a little richness while keeping the recipe simple.
Homemade Flavor
Fresh garlic and herbs give the bread a wonderful savory flavor that you don’t typically get from basic store-bought bread.
Versatile
Use it for sandwiches, toast, dipping, breakfast, dinner, or as a side for soups and salads.
Budget Friendly
Flour, yeast, water, salt, and a little olive oil create a substantial homemade loaf without requiring expensive ingredients.
Frequently Asked Questions
Can I make this bread without a Dutch oven?
Yes. A Dutch oven produces the best crust, but you can bake the loaf on a parchment-lined baking sheet.
For a better crust when using a baking sheet, place a separate oven-safe pan on the bottom rack and carefully add hot water to it when the bread goes into the oven. The steam can help create a crispier crust.
Why is my dough so sticky?
No-knead bread dough is naturally sticky because it contains a relatively high amount of water. Avoid adding excessive flour because this can make the finished loaf dense.
Can I let the dough rise longer than 12 hours?
Yes, depending on the room temperature. A cooler environment allows for a longer rise. If your kitchen is warm, the dough may ferment faster.
Can I use whole wheat flour?
You can replace part of the all-purpose flour with whole wheat flour. Start by replacing about 1 cup of the all-purpose flour. Whole wheat flour absorbs more water and produces a denser loaf.
Can I use bread flour?
Yes. Bread flour works very well and can produce a slightly chewier loaf with excellent structure.
Can I make this recipe gluten-free?
A gluten-free flour blend designed specifically for yeast bread may work, but the texture will be different from traditional wheat-based bread.
How should I store homemade bread?
Once completely cooled, store the loaf at room temperature in a bread bag or loosely wrapped container.
Avoid refrigerating it unless necessary because refrigeration can cause bread to stale faster.
Can I freeze this bread?
Yes. Allow the bread to cool completely, slice it, and place the slices in a freezer-safe bag or container. Freeze for up to several weeks for the best quality.
Individual slices can be thawed at room temperature or warmed directly in a toaster.
How can I get a crispier crust?
Bake the loaf uncovered for the full final 15–20 minutes and allow it to cool on a wire rack.
The Dutch oven method also helps create a wonderfully crisp crust.
Why didn’t my bread rise?
The most common reasons are inactive yeast, water that was too hot or too cold, an overly cold room, or insufficient rising time.
Make sure your yeast is fresh and give the dough enough time to become visibly bubbly and expanded.
Final Thoughts
This No-Knead Garlic Herb Homemade Bread proves that making beautiful homemade bread doesn’t have to be complicated. There is no kneading, no eggs, no butter, and no expensive bread machine required.
Mix the dough, let time do the work, shape it gently, and bake until the crust becomes beautifully golden and crisp. The inside stays soft and fluffy while garlic, rosemary, and thyme add incredible flavor.
It’s the perfect bread to make when you want something warm and homemade without spending hours in the kitchen.