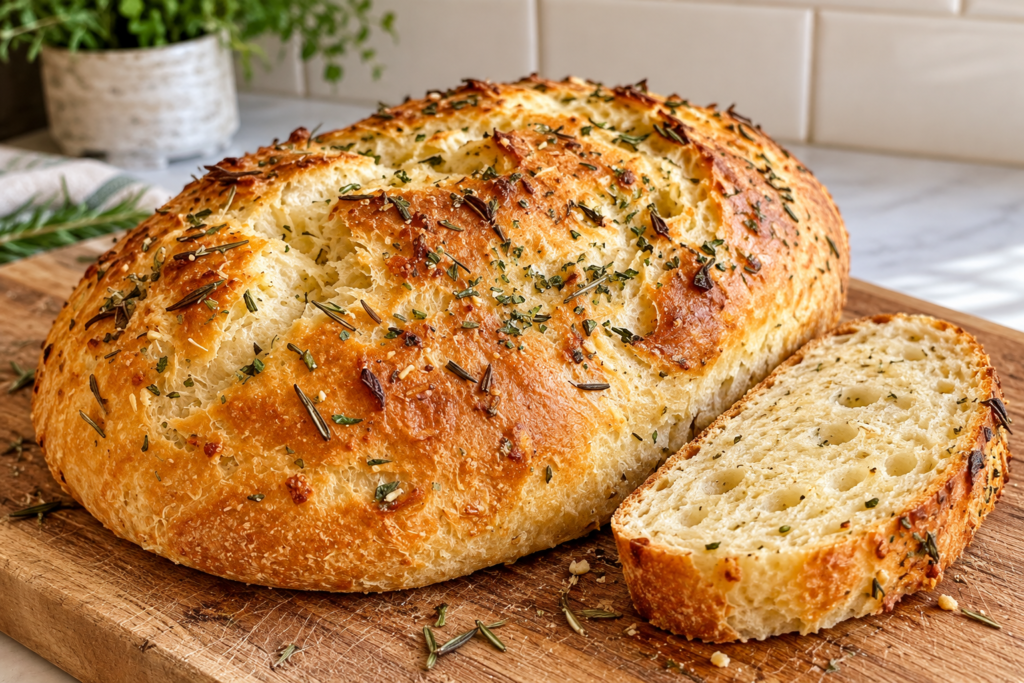

Garlic Rosemary Bread
Prep Time: 25 minutes
Rise Time: 1 hour 30 minutes–2 hours
Cook Time: 30–35 minutes
Cooling Time: 45 minutes
Total Time: Approximately 3 hours 15 minutes–3 hours 45 minutes
Servings: 12 slices
Yield: 1 large loaf
This homemade garlic rosemary bread has a golden crust, a soft, gently chewy center, and savory herb flavor in every slice. Made with flour, yeast, olive oil, garlic, and rosemary, it is a simple loaf that pairs beautifully with soups, salads, pasta, and roasted vegetables.
The recipe is inspired by the rustic herb-topped loaf in your photo; the exact ingredients cannot be determined from an image alone. This version uses a straightforward kneaded yeast dough that you can bake on an ordinary baking sheet without a Dutch oven.
Finely chopped rosemary flavors the dough, while garlic adds warmth without overwhelming the bread. A light coating of olive oil helps create an appealing golden finish. Let the loaf cool before slicing, and you will have bread that works equally well for dinner, sandwiches, or toast the next morning.
Ingredients for Easy Garlic Rosemary Bread
3½ cups bread flour, approximately 420 g, plus a little extra for kneading
1 cup plus 2 tablespoons lukewarm water, 270 ml
2¼ teaspoons instant yeast, 7 g
2 teaspoons granulated sugar
1½ teaspoons fine salt, approximately 9 g
2 tablespoons olive oil, plus 1 teaspoon for greasing the bowl
3 medium garlic cloves, very finely minced or grated
1 tablespoon finely chopped fresh rosemary
For the topping: for Easy Garlic Rosemary Bread
1 teaspoon olive oil
1 teaspoon finely chopped fresh rosemary
Bread flour gives the loaf a pleasantly chewy texture and good structure. All-purpose flour also works, although the dough may feel slightly softer. Weighing the flour is the most reliable way to avoid adding too much.
Instructions for Easy Garlic Rosemary Bread
Step 1: Combine the dry ingredients
Add the bread flour, instant yeast, sugar, and salt to a large mixing bowl. Whisk everything together so the yeast and seasoning are evenly distributed.
Instant yeast can go directly into the flour. If you are using active dry yeast instead, dissolve it in the measured lukewarm water with the sugar first and let it stand for 5–10 minutes, following the package instructions.
Step 2: Add the water and flavorings
Pour in the lukewarm water and 2 tablespoons of olive oil. Add the minced garlic and chopped rosemary.
Mix with a sturdy spoon until a rough dough forms and most of the flour is incorporated. The water should feel comfortably warm, never hot. Excessively hot water can damage the yeast and prevent the bread from rising.
Let the rough dough rest for 5 minutes before kneading. This allows the flour to absorb moisture and makes the dough easier to handle.
Step 3: Knead until smooth
Transfer the dough to a lightly floured work surface. Knead for approximately 8–10 minutes, pushing it away with the heel of your hand, folding it back, and turning it regularly.
The finished dough should feel smooth, elastic, and slightly tacky. Add extra flour only a teaspoon or two at a time if it is sticking heavily. Too much flour can make the loaf dense.
Alternatively, knead with a stand mixer and dough hook on low speed for approximately 6–8 minutes.
Step 4: Let the dough rise
Lightly grease a large bowl with the remaining teaspoon of olive oil. Place the dough inside and turn it once to coat the surface.
Cover with a lid, reusable cover, or lightly oiled plastic wrap. Leave it in a warm, draft-free place for 60–90 minutes, or until roughly doubled in size.
A cool kitchen may require more time. Judge the dough by its expansion rather than the clock alone.
Step 5: Shape the loaf
Gently press the risen dough to release large air pockets, then transfer it to your work surface.
Pat it into a thick rectangle. Fold the long edges toward the center, then roll and tuck it into a compact oval. Pinch the seam closed and place the loaf seam-side down on a parchment-lined baking sheet.
The surface should look gently taut without tearing. This tension helps the loaf rise upward and hold its shape.
Step 6: Allow the second rise
Cover the shaped loaf loosely and let it rise for 30–45 minutes, until noticeably puffy.
When gently pressed with a floured fingertip, the dough should spring back slowly and leave a slight indentation. If it springs back immediately, give it a little longer.
While the loaf rises, preheat the oven to 425°F (220°C) so it is fully heated before baking.
Step 7: Add the topping and score
Brush the loaf lightly with 1 teaspoon of olive oil and sprinkle with the remaining chopped rosemary.
Using a bread lame or very sharp knife, make one lengthwise slash approximately ¼ inch deep. Work with a quick, confident movement to avoid dragging the dough.
Scoring gives the expanding loaf a controlled place to open while baking.
Step 8: Bake until golden
Bake on the center rack for 30–35 minutes, until the crust is deeply golden.
If the surface browns too quickly, loosely cover it with foil for the final part of baking. An instant-read thermometer inserted into the center should register approximately 200–205°F (93–96°C) when the loaf is ready.
The underside should also sound hollow when tapped, although temperature is a more reliable check.
Step 9: Cool before slicing
Transfer the bread to a wire rack and let it cool for at least 45 minutes.
Cutting too early releases steam and can leave the center feeling gummy. Once cooled, slice with a serrated bread knife using a gentle sawing motion.
Serve plain, with butter, or alongside olive oil for dipping.
Tips for the Best Garlic Rosemary Bread
Measure flour carefully. If using cups, fluff the flour, spoon it into the cup, and level it without packing.
Keep the dough slightly tacky. A soft dough generally produces a lighter loaf than a stiff, heavily floured one.
Chop rosemary finely. Large needles can feel woody and create overly strong bites.
Mince the garlic thoroughly. Small pieces spread through the loaf more evenly.
Allow enough rising time. Underproofed dough can bake into a tight, heavy loaf.
Avoid an overly hot proofing spot. Gentle warmth is enough; excessive heat can weaken the dough.
Cool on a rack. Air circulation prevents trapped moisture from softening the bottom crust.
Recipe Notes and Variations for Easy Garlic Rosemary Bread
For dried rosemary, use approximately 1 teaspoon in the dough and a small pinch on top. Crush it between your fingers before adding it.
For a milder garlic flavor, replace the fresh garlic with 1 teaspoon of garlic powder. Roasted garlic also works: use about 1 tablespoon of mashed roasted garlic and incorporate it with the wet ingredients.
You can add ⅓ cup of finely grated Parmesan for a savory variation. The cheese adds salt, so consider reducing the fine salt slightly.
This loaf contains wheat and is not gluten-free. A gluten-free flour blend cannot reliably replace bread flour in this particular dough without other changes.
Storage and Freezing
Once completely cooled, store the plain loaf in a bread bag or airtight container at room temperature for up to 2 days. A sealed container keeps the center softer but will gradually soften the crust.
For longer storage, slice the bread and freeze it in a freezer-safe bag for up to 3 months. Separate slices with parchment if you want to remove them individually.
Toast frozen slices directly, or thaw the loaf while wrapped. To refresh a thawed loaf, warm it in a 350°F (175°C) oven for approximately 10 minutes.
Avoid refrigerating plain bread when possible because it tends to become stale more quickly.
Discover 60+ high-protein, low-carb recipes with simple instructions and everyday ingredients. Find breakfast, lunch, dinner, salad, and snack ideas—plus a 30-day meal plan to help you plan ahead.
Explore the Elite Protein Kitchen Cookbook
http://eliteproteinkitchen.gumroad.com/l/Recipes
Serving Ideas for Easy Garlic Rosemary Bread
Serve garlic rosemary bread with tomato soup, vegetable stew, creamy chicken soup, or a bowl of lentils. Its savory flavor also complements roasted vegetables and fresh green salads.
Use thick slices for grilled cheese sandwiches or toast them for bruschetta. Day-old bread makes excellent croutons: cube it, toss lightly with oil, and bake until crisp.
For breakfast, toast a slice and top it with scrambled eggs or mashed avocado.
Estimated Nutritional Information
Per slice, assuming 12 equal slices:
Calories: Approximately 165
Protein: 5 g
Carbohydrates: 28 g
Fat: 4 g
Fiber: 1 g
Sugars: 1 g
Sodium: Approximately 295 mg
Values are estimates and vary with ingredient brands, flour measurements, and slice size. Butter, dipping oil, and optional cheese are not included.
Nutritional Benefits for Easy Garlic Rosemary Bread
This bread supplies carbohydrates for energy and some protein from wheat flour. Olive oil contributes mostly unsaturated fat, while garlic and rosemary provide flavor with little added sugar.
As a white-flour loaf, it is relatively low in fiber. Pair it with beans, vegetables, or a substantial salad to add fiber and variety to the meal.
Frequently Asked Questions for Easy Garlic Rosemary Bread
Can I make this without a stand mixer?
Yes. Hand kneading works well and takes approximately 8–10 minutes.
Why did my bread turn out dense?
Common causes include adding too much flour, inactive yeast, insufficient kneading, or not allowing enough time for the dough to rise.
Can I prepare the dough overnight?
Yes. Cover and refrigerate after kneading for 8–12 hours. If it has not expanded sufficiently, allow additional room-temperature rising time before shaping. The final rise may also take longer while the dough warms.
Do I need a Dutch oven?
No. This recipe is designed for a regular baking sheet.
Can I leave out the sugar?
Yes. The yeast can still ferment the flour’s available sugars, although rising time and browning may change slightly.
How do I keep the crust crisp?
Cool the loaf uncovered on a rack. For the crispest texture, serve it the day it is baked or briefly reheat it before serving.






Pingback: Cranberry Orange Loaf Cake 2026