
Easy No-Knead Rustic Bread
Prep Time: 15 minutes
Rise Time: 2–3 hours
Cook Time: 40–45 minutes
Cooling Time: 1 hour
Servings: 10 slices
Yield: 1 round loaf
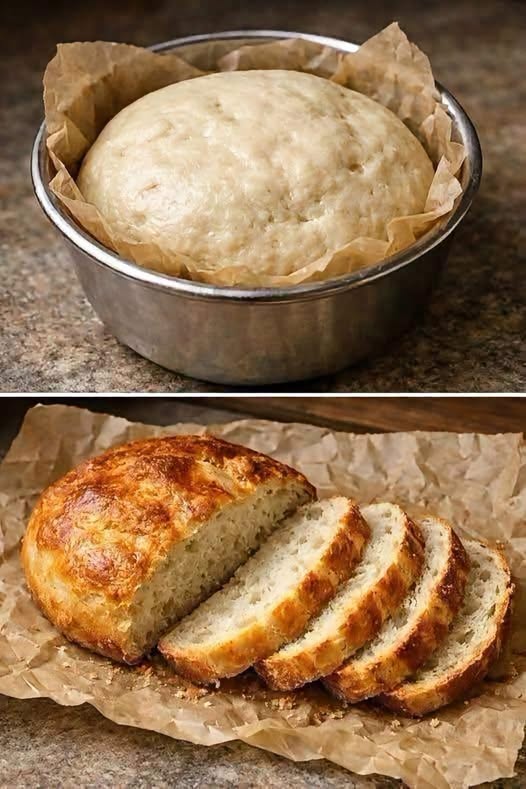
This recipe makes a round loaf like the one pictured, with a golden crust and a soft, slightly chewy center. The exact ingredients cannot be determined from the photo, but this simple yeast bread creates a similar result.
Ingredients
- 3 cups all-purpose flour, spooned and leveled (360 g), plus extra for shaping
- 2 teaspoons instant yeast (about 6 g)
- 1 teaspoon fine salt (6 g)
- 1 teaspoon sugar
- 1¼ cups warm water (300 ml), approximately 100–110°F (38–43°C)
- 1 tablespoon olive oil
- 1 tablespoon melted butter, optional, for brushing after baking
Instructions
Step 1: Combine the dry ingredients
Add the flour, instant yeast, salt, and sugar to a large mixing bowl. Stir thoroughly to distribute the ingredients evenly.
Step 2: Make the dough
Pour in the warm water and olive oil. Stir with a sturdy spoon until no dry flour remains. The dough should look rough, soft, and sticky.
If it feels stiff or dry, add water 1 tablespoon at a time. If it is very loose, let it stand for 10 minutes before deciding whether it needs a little more flour. Avoid adding enough flour to make it firm.
Step 3: Let the dough rise
Cover the bowl with a lid or plastic wrap, leaving room for the dough to expand. Place in a comfortably warm spot for 1½–2 hours, until approximately doubled in size and bubbly on the surface.
The timing will vary with room temperature. Look for the change in volume rather than relying only on the clock.
Step 4: Shape the loaf
Lightly flour your work surface and hands. Scrape the dough onto the surface, then gently fold its edges toward the center several times to form a rough ball.
Turn the dough seam-side down. It does not need kneading or a perfectly smooth finish.
Step 5: Place in the baking pan
Line an 8-inch round cake pan, at least 2 inches deep, with oven-safe parchment paper. Leave a little parchment above the sides so you can lift the bread out later.
Transfer the dough to the pan, seam-side down.
Step 6: Allow a second rise
Cover loosely and let rise for 30–45 minutes, until visibly puffy. It may take closer to an hour in a cool kitchen.
Meanwhile, preheat the oven to 425°F (220°C) with a rack in the middle.
Step 7: Score and bake
Lightly dust the dough with flour, if desired. Using a very sharp knife or bread lame, make one shallow slash across the top, about ¼ inch deep.
Bake for 20 minutes. Reduce the oven temperature to 400°F (200°C) and bake for another 20–25 minutes, until the loaf is deeply golden.
If the top browns too quickly, cover it loosely with foil. The center should register approximately 200–205°F (93–96°C) on an instant-read thermometer.
Step 8: Cool before slicing
Lift the bread out of the pan and remove the parchment. Place the loaf on a wire rack.
For a softer crust, brush the hot loaf with melted butter. For a firmer crust, leave it unbrushed.
Allow to cool for at least 1 hour before slicing. Cutting too early can make the center seem gummy because it is still setting.
Tips
- Measure flour carefully: Weighing it gives the most consistent results. If using cups, spoon the flour into the cup and level it off.
- Keep the dough slightly sticky: Too much extra flour makes the bread heavy.
- Use warm, not hot, water: Excessively hot water can damage the yeast.
- Watch the dough during rising: In a warm kitchen, it may rise faster than the suggested time.
- Check the pan: Use an oven-safe metal cake pan, not an ordinary mixing bowl.
- Cool on a rack: This prevents moisture from collecting under the loaf.
- Slice with a serrated knife: Use a gentle sawing motion to avoid compressing the soft center.
Storage
Keep completely cooled bread in a bread bag or airtight container at room temperature for 2–3 days. The crust will soften during storage.
For longer storage, slice the loaf and freeze in a sealed freezer bag for up to 3 months. Place parchment between slices if you want to remove them individually.
Toast slices directly from frozen, or thaw at room temperature. Avoid refrigerating bread when possible, as it tends to become stale more quickly.
Serving Ideas
- Toast and spread with butter, honey, or jam.
- Serve alongside soup, stew, or chili.
- Make sandwiches with chicken, eggs, cheese, or roasted vegetables.
- Brush slices with garlic butter and toast for easy garlic bread.
- Turn leftover cubes into croutons or a savory bread pudding.
Estimated Nutritional Information
Per slice, based on 10 slices and excluding the optional butter:
- Calories: 145
- Protein: 4 g
- Carbohydrates: 28 g
- Fat: 2 g
- Fiber: 1 g
- Sodium: Approximately 235 mg
Values vary with the ingredients and slice size.
Nutrition Benefits
This bread provides carbohydrates for energy and a small amount of protein. It is not a high-protein bread on its own. Pairing it with eggs, chicken, tuna, or cottage cheese adds protein to the meal.
Replacing some of the all-purpose flour with whole-wheat flour can increase the fiber content.
Q&A
Can I use active dry yeast instead of instant yeast?
Yes. Use the same amount. Stir it into the warm water with the sugar and let stand for 5–10 minutes, until foamy, before adding it to the flour, salt, and oil.
Can I use bread flour?
Yes. Substitute the same weight of bread flour for a slightly chewier loaf. Add a little extra water if the dough feels stiff.
Can I use whole-wheat flour?
Start by replacing 1 cup of the all-purpose flour with 1 cup of whole-wheat flour. You may need an additional 1–2 tablespoons of water. The loaf will be a little denser.
Why did my bread turn out dense?
Common causes include too much flour, inactive yeast, insufficient rising time, or slicing before the loaf has cooled.
Can I make it without sugar?
Yes. The small amount of sugar is optional; the yeast can still ferment the sugars available in the flour.
Do I need a Dutch oven?
No. This recipe uses a regular oven-safe metal cake pan to support the dough and create a round loaf.
Can I add herbs or cheese?
Yes. Mix 1–2 teaspoons of dried herbs or about ½ cup of shredded cheese into the dough. Keep additions modest so the loaf can rise properly.