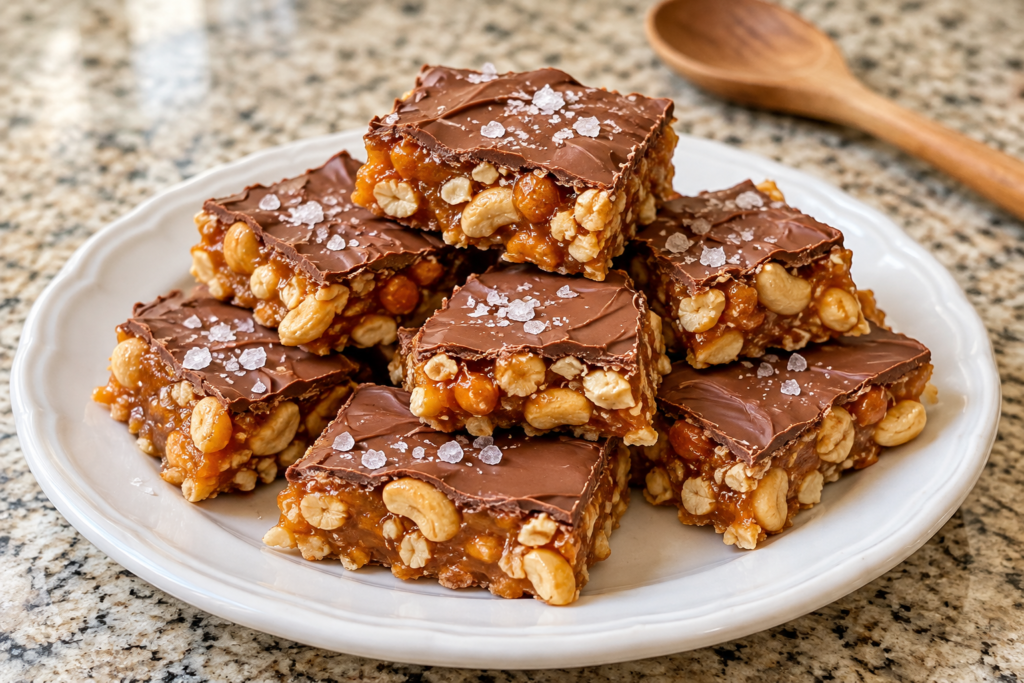

Chocolate Caramel Nut Bars
Prep Time: 15 minutes
Cook Time: 10 minutes
Chill Time: 2 hours
Total Time: 2 hours 25 minutes
Servings: 16 small bars
Pan Size: 8-inch square pan
Chocolate caramel nut bars combine crunchy roasted nuts, chewy caramel, and a smooth milk chocolate topping finished with flaky sea salt. Each square has a delicious mix of sweet, salty, creamy, and crunchy textures.
Inspired by your photo, this version uses peanuts and cashews held together with melted soft caramel candies. There is no biscuit base, and you do not need to bake the bars or make caramel from scratch. The result is a simple homemade candy-style treat that looks beautiful stacked on a plate.
The most important step is allowing the caramel layer to firm up before slicing. A short rest outside the refrigerator then brings the bars to a pleasantly chewy texture.
Ingredients for chocolate caramel nut bars
For the caramel nut layer:
11 ounces (310 g) soft, chewy caramel candies, unwrapped
2 tablespoons heavy cream
1 tablespoon unsalted butter
1 teaspoon vanilla extract
1½ cups (210 g) roasted unsalted peanuts
1 cup (140 g) roasted unsalted cashews, roughly chopped
For the chocolate topping:
7 ounces (200 g) milk chocolate, finely chopped
½ teaspoon flaky sea salt, or to taste
Ingredient Notes for chocolate caramel nut bars
Use soft caramel candies intended for chewing, rather than hard caramel sweets. Thick caramel sauce from a jar is not a direct substitute: it generally stays too soft to hold these bars together.
Roasted nuts give the filling a deeper flavor and a crisp texture. Unsalted nuts allow you to control the saltiness with the topping. Lightly salted nuts also work, but reduce the finishing salt.
Milk chocolate creates a sweet topping similar to the one shown in the image. Semisweet or dark chocolate can replace it in the same quantity if you prefer a less sweet finish.
Instructions for chocolate caramel nut bars
Step 1: Prepare the pan
Line an 8-inch square pan with parchment paper, leaving an overhang on two sides. This makes it easier to lift out the slab once it has set.
Lightly grease any exposed sides of the pan. Have all your ingredients measured before melting the caramel because the mixture becomes thicker as it cools.
Step 2: Prepare the nuts
Place the roasted peanuts and roughly chopped cashews in a large heatproof bowl.
Keep some larger pieces for crunch, but chop oversized cashews so the finished bars are easier to cut. Avoid grinding the nuts into fine crumbs; the filling should have plenty of visible texture.
If your nuts have been refrigerated, let them reach room temperature first. Very cold nuts can cause the melted caramel to firm up too quickly.
Step 3: Melt the caramel
Place the unwrapped caramel candies, heavy cream, and butter in a heavy-bottomed saucepan.
Warm over low heat, stirring frequently with a heatproof spatula, until the candies have melted into a thick, smooth mixture. This usually takes 5–8 minutes, depending on the candies and your stove.
Keep the heat gentle and avoid boiling the mixture vigorously. Scrape the bottom of the pan as you stir to prevent scorching.
Remove from the heat and stir in the vanilla. The caramel will be very hot, so handle it carefully.
Step 4: Combine the caramel and nuts
Pour the warm caramel over the prepared nuts. Stir until every piece is coated and no large pockets of plain caramel remain.
The mixture should be thick and sticky, with enough caramel to bind the nuts together. Work promptly so it remains easy to spread.
Step 5: Press into the pan
Transfer the mixture to the lined pan. Use a lightly buttered spatula to spread it into the corners and press it into an even layer.
Press firmly enough to remove large gaps between the nuts. An evenly packed layer will hold together better when sliced.
Let the base cool at room temperature for approximately 15 minutes, until it is no longer piping hot. It does not need to be fully set before you add the chocolate.
Step 6: Melt the chocolate
Place the chopped chocolate in a clean, dry microwave-safe bowl. Microwave in 20-second intervals, stirring thoroughly after each interval, until almost melted.
Stir until the remaining pieces melt in the residual heat. Alternatively, melt the chocolate in a heatproof bowl over barely simmering water, keeping the bowl above the water.
Keep water out of the chocolate, as even a small amount can make it seize and become grainy.
Step 7: Add the topping
Pour the melted chocolate over the caramel nut layer. Spread it evenly with the back of a spoon or a small spatula.
Create a few gentle swirls for a homemade finish. Let the chocolate stand for a minute or two, then scatter the flaky sea salt over the surface.
Use a light hand with the salt, especially if your nuts are already salted.
Step 8: Chill and slice
Refrigerate for approximately 2 hours, or until the caramel layer is firm and the chocolate has set.
Lift the slab from the pan using the parchment overhang. Let it stand at room temperature for 10–15 minutes before cutting so the chocolate is less likely to crack.
Using a large, sharp knife, cut into 16 squares. Wipe the blade between cuts. If the caramel is still too soft, return the slab to the refrigerator before continuing.
Tips for Chocolate Caramel Nut Bars
Choose the correct caramel. Soft, chewy candies provide structure; pourable sauce will produce a different result.
Do not add extra cream casually. Too much liquid can prevent the filling from setting firmly.
Melt gently. High heat can scorch the caramel or overheat the chocolate.
Pack the base evenly. Large gaps can cause the bars to break apart.
Allow enough chilling time. The center should feel firm before you lift the slab.
Cut slightly softened bars. Refrigerator-cold chocolate can shatter under the knife.
Serve small portions. These rich bars are satisfying in bite-size squares.
Easy Variations for chocolate caramel nut bars
For chocolate peanut caramel bars, replace the cashews with an equal volume of roasted peanuts.
For a pecan version, use roughly chopped roasted pecans in place of the cashews. Their softer texture gives the bars a different bite.
Dark chocolate makes a pleasant contrast to the sweet caramel. Use the same weight as the milk chocolate and melt it gently.
For an extra decorative finish, reserve a little melted chocolate and drizzle it over the set topping. Allow the drizzle to firm up before stacking the bars.
Storage and Make-Ahead Instructions for chocolate caramel nut bars
Store the bars in an airtight container in the refrigerator for up to 1 week. Place parchment paper between layers to prevent sticking.
For the best eating texture, take out the portions you need about 10–15 minutes before serving. In a warm kitchen, keep the remaining bars refrigerated so the chocolate and caramel do not soften excessively.
To freeze, wrap individual bars and place them in a freezer-safe container for up to 2 months. Thaw in the refrigerator while still wrapped, then let them soften briefly before eating.
These bars are convenient to prepare a day ahead because the overnight chill gives the caramel plenty of time to firm up.
Make Everyday Cooking Easier
Discover 60+ high-protein, low-carb recipes with simple instructions and everyday ingredients. Explore breakfasts, lunches, dinners, salads, and snacks—plus a 30-day meal plan to help you plan ahead.
Get the Elite Protein Kitchen Cookbook
Serving Ideas for chocolate caramel nut bars
Arrange the squares on a white plate to show off their chocolate tops and nut-filled centers. They also work well in small paper candy cases on a dessert platter.
Serve with unsweetened coffee or tea to balance their sweetness. For gifting, separate the pieces with parchment and keep them chilled until shortly before delivery.
Estimated Nutritional Information
Per bar, based on 16 servings:
Calories: Approximately 280
Protein: 6 g
Carbohydrates: 27 g
Fat: 18 g
Fiber: Approximately 2 g
These values are estimates and depend on the caramel and chocolate brands used.
Frequently Asked Questions for chocolate caramel nut bars
Can I use caramel sauce instead of candies?
Not as a direct replacement. Most caramel sauces remain too soft to create bars that hold their shape.
Why are my bars too hard?
They may simply be very cold, or the caramel may have been overheated. Let them soften briefly before serving.
Why did the chocolate crack when cutting?
The topping was likely too cold. Rest the slab at room temperature briefly and use a sharp knife with steady pressure.
Do I need to temper the chocolate?
Tempering is not necessary for this refrigerated homemade version. Untempered chocolate can soften at room temperature, so chilled storage is best.






Pingback: Soft Sourdough Sandwich Bread