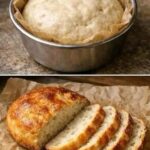

Fluffy Grain-Free Carnivore Bread
This savory loaf uses eggs, cream cheese, and egg white protein powder to create a light, sliceable alternative to wheat bread. Whipped egg whites provide the lift, so the bread can rise without flour. It has a mild egg and dairy flavor and tastes especially good toasted.
I couldn’t access the article you linked, so this is an independently written recipe, not a verified copy of that page. It follows the same general approach as other egg and dairy carnivore bread recipes. Also, “zero-carb” is not a reliable description for every loaf: cream cheese and protein powder can contain small amounts of carbohydrate, so check your ingredient labels if that matters to you.
Prep Time: 20 minutes
Cook Time: 35–45 minutes
Cooling Time: At least 1 hour
Servings: 10–12 slices
Ingredients
- 8 large eggs, at room temperature
- 4 ounces full-fat cream cheese, softened
- ½ cup unflavored egg white protein powder
- ½ teaspoon salt
- 1 tablespoon melted butter, cooled slightly, plus a little more for the pan
Instructions
Step 1: Prepare the oven and pan. Preheat the oven to 325°F (165°C). Lightly butter an 8½-by-4½-inch loaf pan, then line it with parchment paper. Leave some parchment extending above the two long sides so you can lift the baked loaf out easily. This bread is delicate while warm, and the parchment will help you remove it without tearing the sides.
Step 2: Separate the eggs. Place the egg whites in a large, completely clean and dry mixing bowl. Put the yolks in a second bowl. Take care not to get any yolk in the whites, because fat can make them difficult to whip. Separating each egg over a small bowl first can help: once the white is cleanly separated, add it to the large bowl and continue with the next egg.
Step 3: Make the yolk mixture. Add the softened cream cheese to the egg yolks. Beat until smooth, scraping down the sides of the bowl as needed. Add the egg white protein powder and salt, then beat again until there are no dry patches. Mix in the tablespoon of cooled melted butter. The mixture will be thicker than an ordinary cake batter; that is expected.
Step 4: Whip the egg whites. Using an electric mixer with clean beaters, whip the egg whites until they form stiff peaks. When you lift the beaters, a peak should stand up and hold its shape. Stop once the whites reach this point. If they become dry and grainy from overbeating, they will be harder to fold into the yolk mixture.
Step 5: Lighten the batter. Add about one-third of the whipped whites to the yolk mixture. Stir this first portion in gently to loosen the thick batter. It is fine if this small addition loses some of its volume; its job is to make the remaining whites easier to incorporate.
Step 6: Fold in the remaining whites. Add the rest of the egg whites in two additions. Use a large spatula to cut down through the center of the mixture, sweep along the bottom of the bowl, and fold the batter over the top. Rotate the bowl and repeat until most of the white streaks disappear. Work gently and stop as soon as the batter is combined. The trapped air is what gives this loaf its height.
Step 7: Fill the pan. Spoon the batter into the prepared loaf pan. Spread it gently into the corners without pressing it down. Smooth the top lightly with the spatula. Place the pan in the oven soon after mixing; leaving the batter standing for a long time can allow some of the whipped air to escape.
Step 8: Bake the bread. Bake for 35–45 minutes, until the top is golden and the center feels set when lightly touched. The loaf should not wobble like uncooked batter when you gently move the pan. If the top browns before the center is ready, lay a loose piece of foil over the pan for the remaining baking time. Avoid opening the oven during the first 30 minutes, when the structure is still developing.
Step 9: Cool gradually. Remove the pan from the oven and leave the bread in it for 10–15 minutes. Lift it out using the parchment and transfer it to a wire rack. Let it cool completely for at least 1 hour before slicing. The loaf will firm up as it cools, and some settling is normal for bread made without flour.
Step 10: Slice and serve. Use a sharp serrated knife and a gentle sawing motion to cut the loaf into 10–12 slices. Serve it as it is, or toast a slice in a dry skillet over low to medium heat until the edges are lightly golden. Toasting helps the bread feel sturdier and brings out its savory flavor.
Tips
Use room-temperature eggs. Whites whip more readily when they are no longer refrigerator-cold. If you forget to take the eggs out ahead of time, place the whole eggs in a bowl of lukewarm water for about 10 minutes, then dry them before cracking.
Choose unflavored protein powder. Sweetened or flavored powder will change the taste of the bread. Check that yours is egg white protein powder, rather than a baking mix containing added flour or starch. Different brands absorb moisture differently, so the thickness of the yolk mixture may vary slightly.
Soften the cream cheese fully. Cold cream cheese can leave lumps in the batter. Give it time to soften before mixing, and beat it thoroughly with the yolks. A smooth base makes it easier to fold in the whipped whites without repeatedly stirring and deflating them.
Keep the egg-white bowl free of grease. Even a little butter, cream cheese, or egg yolk can interfere with whipping. Wash and dry the bowl and beaters carefully before you begin. Glass or stainless steel bowls work well.
Expect a different texture from wheat bread. This loaf is soft and airy, with an egg-based crumb. It will not have the chew or flavor of a yeast loaf. If you want slices for a sandwich, let the bread cool completely and toast them lightly first. Thin slices are more delicate than thicker ones.
Watch for doneness in the center. A golden top alone does not mean the loaf is fully baked. The middle should feel set rather than wet or jiggly. An underbaked loaf is more likely to sink heavily as it cools or feel damp when sliced. Oven temperatures differ, so use the appearance and firmness of the bread along with the suggested time.
Storage
Once the loaf is completely cool, store it in an airtight container in the refrigerator for up to 4 days. You can slice it before storing so individual pieces are ready to toast. Place a small piece of parchment between slices if they tend to stick together.
For longer storage, freeze the cooled slices in a sealed freezer bag for up to 2 months. Separate them with parchment so you can remove one or two at a time. Thaw in the refrigerator, then warm the slices in a skillet or toaster oven. Use gentle heat and watch them closely, as thin slices can brown quickly.
Serving Ideas
Spread a warm slice with butter, or use two lightly toasted slices for an egg, cheese, or sliced-meat sandwich. You can also serve it alongside soup or use a thicker toasted slice as the base for a savory breakfast. Keep fillings fairly light so the soft bread holds together when lifted.