
Creamy Chocolate Mousse
Prep Time: 15 minutes
Cook Time: 5 minutes
Chill Time: 2 hours
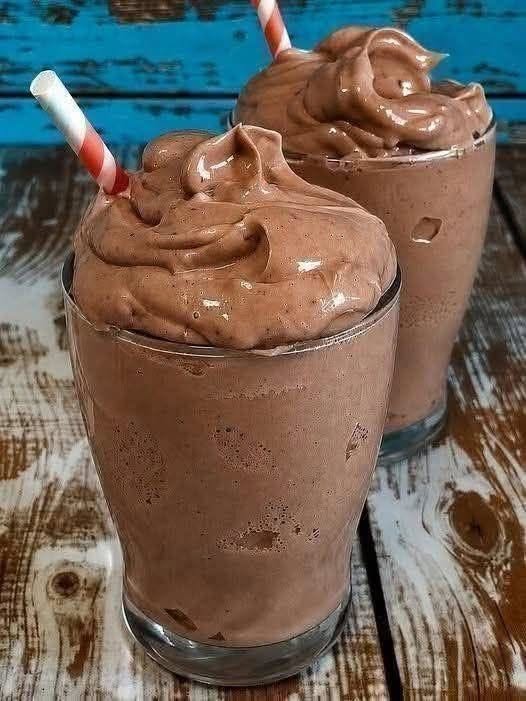
Servings: 4 small servings or 2 large glasses, as pictured
This egg-free chocolate mousse is rich, fluffy, and smooth, with a deep chocolate flavor. Serve it in clear glasses with a generous swirl on top for a dessert inspired by the photo.
Ingredients
- 4 oz (115 g) semisweet chocolate, finely chopped
- 1½ cups cold heavy whipping cream, divided
- 2 tablespoons powdered sugar, optional
- 1 teaspoon vanilla extract
- A small pinch of salt
Instructions
- Prepare the chocolate. Place the chopped chocolate in a medium heatproof bowl. Smaller pieces melt more evenly.
- Warm the cream. Pour ½ cup of the heavy cream into a small saucepan. Heat over medium-low heat until steaming and small bubbles appear around the edges. Do not bring it to a rolling boil.
- Melt the chocolate. Pour the warm cream over the chocolate. Leave undisturbed for 2 minutes, then stir gently until smooth and glossy. Stir in the vanilla and salt.
- Let it cool. Allow the chocolate mixture to cool for 10–15 minutes, stirring occasionally. It should feel close to room temperature but remain fluid. Warm chocolate can deflate the whipped cream.
- Whip the remaining cream. Pour the remaining 1 cup cold cream into a separate mixing bowl. Add the powdered sugar if you prefer a sweeter mousse. Beat with an electric mixer on medium speed until medium peaks form—the cream should hold its shape with tips that gently curl over. Avoid whipping until grainy.
- Lighten the chocolate. Stir about one-third of the whipped cream into the cooled chocolate mixture. This makes it easier to fold in the remaining cream.
- Fold gently. Add the remaining whipped cream in two batches. Use a spatula to scoop from the bottom and fold over the top, rotating the bowl as you work. Stop when no white streaks remain.
- Fill the glasses. Spoon the mousse into four small dessert glasses or two larger glasses. For the pictured look, reserve some mousse in a piping bag fitted with a wide round nozzle.
- Chill. Refrigerate the filled glasses and reserved mousse for about 2 hours, until set. Pipe or spoon the reserved mousse into generous swirls on top before serving. If the reserved mousse becomes too firm to pipe, let it soften briefly at room temperature.
Tips
- Use a chocolate bar you enjoy eating for the best flavor and smooth melting.
- Keep the whipping cream cold until needed.
- Taste the chocolate mixture before adding sugar; semisweet chocolate may provide enough sweetness.
- Add ½ teaspoon instant espresso powder to the warm cream for a deeper chocolate flavor.
- For a darker, less sweet version, use chocolate with 60–70% cocoa.
- Serve with spoons—the mousse will be thicker than a milkshake.
Storage
- Cover and refrigerate for up to 3 days.
- Keep chilled until serving.
- Freeze in covered, freezer-safe containers for up to 1 month. Thaw overnight in the refrigerator; the texture may become slightly denser.
Estimated Nutrition Per Small Serving
Using semisweet chocolate and the optional powdered sugar:
- Calories: 430
- Protein: 4 g
- Carbohydrates: 25 g
- Fat: 37 g
- Fiber: 2 g
Nutrition varies by brand. One large glass contains approximately two small servings.
Recipe Benefits
- No raw eggs or gelatin.
- Requires only a few ingredients.
- Easy to prepare ahead for guests.
- Naturally flour-free; check ingredient labels if you need it to be gluten-free.
Q&A
Can I use milk instead of heavy cream?
No. Milk will not whip or provide the structure this mousse needs.
Can I use milk chocolate?
Yes, but it will be sweeter and may set a little softer. Omit the optional sugar.
Why did my mousse turn grainy?
The cream may have been overwhipped, or the chocolate may have cooled until it began to set before folding. Use fluid, room-temperature chocolate and gently whipped cream.
Why is my mousse runny?
The chocolate may have been too warm, or the cream may not have been whipped enough. Chill for the full 2 hours before assessing the texture.
Can I make it the night before?
Yes. Cover and refrigerate overnight, then add the finishing swirl before serving.