
Air Fryer Poached Eggs
Prep Time: 5 minutes
Cook Time: 6–10 minutes, depending on your air fryer
Servings: 4 eggs
Ingredients
- 4 large eggs
- 8 tablespoons hot water, divided
- 1 teaspoon olive oil or softened butter, for greasing
- Salt, to taste
- Freshly ground black pepper, to taste
Equipment
- Air fryer
- 4 small, oven-safe ramekins
- Small cup for cracking eggs
- Slotted spoon
- Silicone spatula
- Oven mitts
Instructions
Step 1: Choose suitable ramekins.
Use four small ceramic ramekins rated for oven use at the cooking temperature. Each should comfortably hold one egg and 2 tablespoons of water without being filled close to the rim.
Check that the ramekins fit inside your air fryer basket with some space between them. Air needs to circulate around the containers for reasonably even cooking. If your basket is small, cook two eggs at a time rather than squeezing all four inside. Avoid ordinary drinking cups or dishes that are not designed for oven heat.
Step 2: Preheat the air fryer.
Preheat the air fryer to 350°F (175°C) for approximately 3 minutes, or follow your appliance’s preheating instructions.
Starting with a warm appliance makes the timing more consistent. However, air fryers differ considerably in how strongly they heat, so treat the cooking window as a starting point. Your first batch will help you establish the timing that works with your particular appliance, ramekins, and preferred yolk texture.
Step 3: Grease the ramekins.
Divide the teaspoon of olive oil or softened butter between the four ramekins. Spread a thin coating across the bottom and slightly up the sides.
A pastry brush or folded piece of paper towel makes this easy. The coating helps prevent the cooked whites from sticking and makes the eggs easier to lift out. You only need a light layer; a pool of oil is unnecessary. Pay particular attention to the bottom, where most of the egg white will settle.
Step 4: Add the hot water.
Pour 2 tablespoons of hot water into each prepared ramekin. Use the same amount in every container to keep the cooking conditions similar.
The water provides moisture around the egg while it cooks. This method produces a poached-style egg, although its shape and texture may differ slightly from a traditional egg poached in a saucepan. Set the ramekins on a stable surface while filling them, and handle carefully to avoid spilling the hot water.
Step 5: Add one egg to each ramekin.
Crack an egg into a small cup first. Check for shell fragments, then gently slide the egg into a ramekin. Repeat with the remaining eggs.
Cracking into a separate cup gives you better control and helps preserve the yolks. Try to avoid dropping the eggs from a height, which can break the yolk or splash the water. A little spreading of the white is normal. Do not stir the eggs after adding them.
Step 6: Arrange the ramekins in the basket.
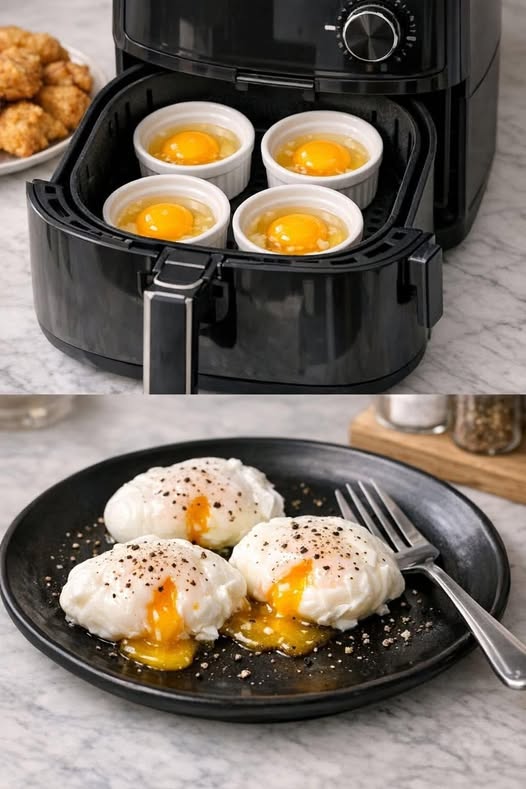
Carefully place the filled ramekins inside the air fryer basket, keeping them level. Leave small gaps between the containers and make sure they sit securely.
Move the basket gently so the water does not spill. If one position in your air fryer tends to cook faster than another, remember that you may need to remove individual eggs at slightly different times. Equal ramekin sizes help, but they cannot completely eliminate differences in airflow.
Step 7: Cook and check early.
Air-fry at 350°F (175°C), checking the eggs after 6 minutes. Many batches will take approximately 6–10 minutes, but some setups may require longer.
Look for whites that have turned opaque and set, with yolks that remain softly rounded. If the whites are still translucent or loose, continue cooking in 1-minute intervals. Check carefully because the change from a soft yolk to a firm one can happen quickly. For firmer eggs, extend cooking until the yolks reach your preferred consistency.
Step 8: Remove and rest briefly.
Using oven mitts, carefully lift the ramekins from the basket and place them on a heatproof surface. The ceramic and water will be very hot.
Let the eggs stand for approximately 1 minute. They continue cooking slightly from the retained heat, so avoid leaving them in the hot ramekins for an extended period if you want soft yolks. Keep the containers stable while handling them and avoid touching their rims with bare fingers.
Step 9: Release and drain the eggs.
Run a small silicone spatula gently around the edge of each egg to loosen any attached white. Slide a slotted spoon underneath and carefully lift it out.
Hold the spoon above the ramekin for a few seconds to allow excess water to drain. If serving over toast, briefly touch the underside of the spoon to a clean paper towel to absorb lingering droplets. Handle softly so the whites remain intact and the yolks do not break prematurely.
Step 10: Season and serve.
Transfer the eggs to a plate or your chosen breakfast base. Sprinkle with salt and freshly ground black pepper.
Serve immediately for the best contrast between tender whites and warm yolks. To recreate the presentation in the photo, arrange several eggs on a dark plate and gently open one yolk just before serving. The golden center will flow naturally across the plate. Add seasoning after cooking so you can adjust each portion individually.
Tips
Test one egg first. A trial egg is the easiest way to establish reliable timing without overcooking an entire batch.
Use matching ramekins. Different materials, thicknesses, and sizes can change how quickly the eggs cook.
Check the whites carefully. A white surface does not always mean the deeper portion is fully set.
Avoid overcrowding. Leave room for airflow and cook in batches when necessary.
Drain thoroughly. Excess water can make toast soggy or dilute sauces.
Choose your yolk texture. Soft yolks need closer monitoring; firm yolks require additional time.
For soft eggs, consider pasteurized eggs. If you need fully cooked eggs, continue until both the whites and yolks are firm.
Storage
These eggs are best eaten immediately, particularly when you want runny yolks. If storing leftovers, refrigerate promptly in a covered container and use within 2 days.
Keep them separate from toast or other ingredients that may absorb moisture. Reheat gently until thoroughly hot, understanding that the yolks will become firmer.
Freezing is not recommended for this recipe because the cooked whites can develop an unpleasant texture. Preparing a fresh batch generally gives a better result.
Serving Ideas
Serve over buttered toast, avocado toast, or a toasted English muffin. The soft yolk adds richness without needing a complicated sauce.
For a more substantial breakfast, pair the eggs with sautéed spinach, mushrooms, roasted potatoes, or smoked salmon.
They also work well over a warm grain bowl or alongside a tomato-cucumber salad. Keep any additional toppings ready before cooking so the eggs can be served promptly.
Nutrition Benefits
Eggs provide protein, choline, vitamin B12, and selenium. Pairing them with whole-grain toast and vegetables adds fiber and makes the meal more varied.
Estimated nutrition per egg: Approximately 80–90 calories, 6 grams of protein, and 6 grams of fat, including a small amount of greasing oil. Actual values depend on egg size and how much oil remains on the food. Bread and other accompaniments are additional.
Q&A
Do I need vinegar?
No. The ramekins contain the eggs, so vinegar is unnecessary.
Can I use cold water?
Yes, but it may extend cooking time. Hot water makes the method more consistent.
Why did my yolks become hard?
The eggs cooked longer than needed for your appliance. Check earlier next time.
Can I skip the water?
Yes, but the result is a baked egg with a different texture.
Can I use silicone cups?
Only if they are suitable for the cooking temperature. Expect different timing.
Why are the eggs sticking?
The ramekins may need a more even coating of oil or butter. Loosen the edges gently before lifting.