
Easy Pumpkin Pie Truffles
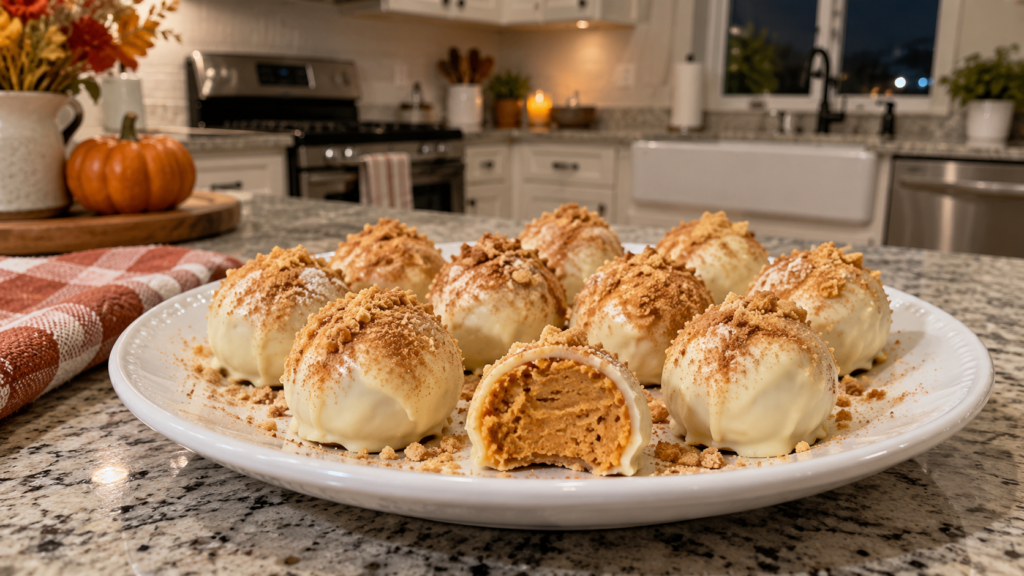
These easy pumpkin pie truffles bring the familiar flavors of pumpkin pie into a small, creamy dessert with a delicate white chocolate shell. Each bite combines pumpkin purée, cream cheese, graham cracker crumbs, and warm spices. A sprinkle of cinnamon and cookie crumbs adds a simple finishing touch.
The filling tastes like a cross between pumpkin cheesecake and pumpkin pie, with enough graham cracker crumbs to hold its shape. The white chocolate coating adds sweetness and a gentle snap that contrasts with the soft center.
There is no baking required, making these truffles convenient for fall gatherings, Halloween dessert trays, Thanksgiving celebrations, or a weekend treat. Prepare them ahead, keep them refrigerated, and arrange them on a serving plate shortly before guests arrive.
Prep time: 30 minutes
Cook time: 5 minutes for melting chocolate
Chilling time: Approximately 2 hours
Total time: Approximately 2 hours 35 minutes
Yield: About 24 truffles
Serving size: 1 truffle
Ingredients for Easy Pumpkin Pie Truffles
For the pumpkin filling:
4 ounces full-fat block cream cheese, softened
⅓ cup canned pumpkin purée
⅓ cup powdered sugar
1 teaspoon vanilla extract
1½ teaspoons pumpkin pie spice
¼ teaspoon ground cinnamon
⅛ teaspoon salt
1¾ cups finely crushed graham cracker crumbs, approximately 200 grams
Up to ¼ cup additional graham cracker crumbs, only if needed
For the coating:
12 ounces white chocolate baking bars, finely chopped
1 teaspoon refined coconut oil, optional
For the topping:
2 tablespoons finely crushed graham crackers
A light sprinkle of ground cinnamon
Use plain pumpkin purée rather than pumpkin pie filling. Pumpkin pie filling already contains sweeteners and spices, which would change the flavor and consistency.
Block cream cheese works better than spreadable cream cheese from a tub because it generally produces a firmer filling.
Instructions
1. Prepare the baking sheet
Line a baking sheet or large plate with parchment paper. Choose something that fits comfortably inside your refrigerator.
Measure the ingredients before starting. Let the cream cheese soften just enough to beat smoothly, but avoid leaving it out until it becomes warm or runny.
If crushing your own graham crackers, use a food processor or place them inside a sealed bag and crush with a rolling pin. Fine, even crumbs create a smoother filling.
2. Check the pumpkin purée
Stir the pumpkin purée before measuring. It should be thick and spoonable.
If you notice visible liquid or your homemade purée seems watery, blot it lightly with paper towels or drain it through a fine sieve. Excess moisture makes the mixture sticky and difficult to roll.
Measure the required ⅓ cup after removing excess liquid.
3. Beat the cream cheese
Place the softened cream cheese in a medium mixing bowl. Beat with a hand mixer until smooth, approximately one minute.
Scrape down the sides and bottom of the bowl. This helps prevent small lumps of cream cheese from remaining in the finished filling.
4. Add pumpkin and flavorings
Add the pumpkin purée, powdered sugar, vanilla, pumpkin pie spice, cinnamon, and salt.
Beat until evenly combined. The mixture should look creamy and pale orange, with no visible streaks.
The salt balances the sweetness, while the extra cinnamon strengthens the pumpkin pie flavor without overwhelming the filling.
5. Mix in the graham cracker crumbs
Fold in 1¾ cups graham cracker crumbs using a spatula. Mix thoroughly, then let the filling stand for five minutes so the crumbs can absorb moisture.
The mixture should resemble a soft cookie dough. It may feel slightly tacky, but it should hold together when pressed.
If it remains loose, add extra crumbs one tablespoon at a time. Avoid adding too many immediately, as the filling will firm further during chilling.
6. Chill the filling
Cover the bowl and refrigerate for approximately one hour, or until the mixture is firm enough to scoop.
Chilling makes shaping easier and gives the spices time to blend throughout the filling. If your refrigerator is crowded or the mixture started warm, it may need additional time.
7. Shape the truffles
Scoop the chilled filling into approximately 24 portions, using about one level tablespoon for each.
Roll gently between your palms to create small balls. Place them on the parchment-lined tray with a little space between each one.
If the mixture begins sticking to your hands, wash and dry them, then return the filling to the refrigerator briefly. Avoid adding water to your hands, which can introduce unwanted moisture.
8. Chill the shaped centers
Refrigerate the rolled centers for another 30 minutes.
They should feel firm when lifted but should not be frozen solid. Very cold or frozen centers can cause the chocolate to set too quickly or develop cracks as the filling warms.
9. Melt the white chocolate
Place the chopped white chocolate in a completely dry, microwave-safe bowl.
Microwave at half power in 20-second intervals, stirring thoroughly after each interval. Stop heating when only a few small pieces remain, then stir until smooth.
If desired, stir in one teaspoon of refined coconut oil to make the coating slightly more fluid. Avoid overheating white chocolate, as it can become thick or grainy.
10. Dip and decorate
Place one chilled center on a fork and lower it into the melted chocolate. Spoon chocolate over any uncovered areas.
Lift the truffle and gently tap the fork against the bowl to remove excess coating. Slide it onto the parchment using a toothpick or another fork.
Immediately sprinkle with graham cracker crumbs and a little cinnamon before the shell sets. Repeat with the remaining centers, working in small batches.
11. Set and serve
Refrigerate the coated truffles for approximately 30 minutes, or until the chocolate is firm.
Transfer to a serving plate and enjoy chilled. For a slightly softer center, allow a small serving portion to stand at room temperature for about five minutes before eating.
Notes and Tips for Easy Pumpkin Pie Truffles
Use good melting chocolate. White chocolate baking bars usually melt more smoothly than white chocolate chips. White candy melts are another option, although their flavor and melting instructions differ.
Keep moisture away from the coating. Even a small amount of water can make melted chocolate seize. Make sure your bowl, spoon, and dipping utensils are completely dry.
Adjust texture gradually. Pumpkin brands vary in thickness. Give the crumbs time to absorb moisture before deciding whether the filling needs more.
Aim for a thin coating. Let excess chocolate drip away before placing each truffle on the tray. A very thick shell can overpower the pumpkin filling.
Decorate immediately. Sprinkle crumbs onto each freshly dipped truffle. Waiting until the entire batch is coated may leave the first shells too firm for toppings to stick.
Discover 60+ high-protein, low-carb recipes with simple instructions and everyday ingredients. Find breakfast, lunch, dinner, salad, and snack ideas—plus a 30-day meal plan to help you plan ahead.
Explore the Elite Protein Kitchen Cookbook
Make them ahead. These are convenient for entertaining because the chilling and dipping can be completed the day before serving.
Variations for Easy Pumpkin Pie Truffles
For a stronger spice flavor, replace some of the graham cracker crumbs with finely crushed gingersnaps. Start with a small substitution because gingersnaps vary in sweetness and intensity.
For a different coating, use milk or dark chocolate. The result will have a more pronounced chocolate flavor, while white chocolate allows the pumpkin spices to stand out.
For a gluten-free version, use certified gluten-free graham crackers and check the labels of the remaining ingredients. Adjust the crumb quantity as needed because different crackers absorb moisture differently.
Storage and for Easy Pumpkin Pie Truffles
Store the truffles in an airtight container in the refrigerator for up to four days. Separate stacked layers with parchment paper to protect the coating.
For longer storage, freeze in a freezer-safe container for up to one month for best quality. Thaw overnight in the refrigerator with the container closed to help reduce condensation.
Keep the main batch refrigerated during parties and replenish a smaller serving plate as needed. Because the filling contains cream cheese, avoid leaving the truffles at room temperature for more than two hours.
Nutritional Information for Easy Pumpkin Pie Truffles
Estimated per truffle, based on 24 truffles:
Nutrient Approximate amount
Calories 140
Carbohydrates 18 g
Total sugars 13 g
Protein 2 g
Total fat 7 g
Saturated fat 4 g
Fiber Less than 1 g
Sodium 80 mg
These figures are estimates. Actual nutrition depends on ingredient brands, coating thickness, additional crumbs, and the final number of truffles.
Nutritional Benefits for Easy Pumpkin Pie Truffles
Pumpkin contributes beta-carotene, which the body can convert into vitamin A. However, the amount of pumpkin in each truffle is small, so these should be enjoyed primarily as a dessert.
Cream cheese and white chocolate contribute small amounts of calcium and protein. Graham crackers provide carbohydrates, while cinnamon and pumpkin pie spice add flavor without requiring extra frosting.
The individual portions make it easy to serve a small sweet treat. These truffles still contain added sugar and saturated fat, so portion size matters.
Questions and Answers for Easy Pumpkin Pie Truffles
Can I use homemade pumpkin purée?
Yes. It must be thick, smooth, and cooled completely. Drain watery purée before measuring.
Why is my filling too sticky?
It may need more chilling, or the pumpkin may contain excess moisture. Chill first, then add extra crumbs gradually if necessary.
Can I skip the white chocolate coating?
Yes. Roll the chilled centers in finely crushed graham crackers instead. They will remain softer and should be served cold.
Why did my coating crack?
The centers may have been frozen or the coating too warm. Use refrigerated centers and allow freshly melted chocolate to cool slightly before dipping.
Can I make these without a mixer?
Yes. Use softened cream cheese and beat it thoroughly with a sturdy spoon before adding the other ingredients.
Can I double the recipe?
Yes. Double the ingredients and use additional trays. Keep the centers refrigerated while dipping smaller batches.