
Strawberry Cheesecake Protein Fluff Cups 🍓
Prep Time: 15 minutes
Cook Time: None
Chill Time: At least 2 hours
Servings: 6
IngredientsStrawberry Cheesecake Protein Fluff Cups
- 1 small package sugar-free strawberry gelatin, approximately 0.3 oz (8.5 g), typically sized to make 4 servings
- ½ cup boiling water
- ½ cup cold water
- 2 cups plain nonfat Greek yogurt
- 4 oz (113 g) reduced-fat cream cheese, softened
- 1 teaspoon vanilla extract
- 1 cup thawed sugar-free whipped topping
Instructions
Step 1: Prepare your ingredients and containers.
Set out six small dessert cups, a heatproof bowl, a large mixing bowl, a whisk, and a spatula. A hand mixer makes the cream cheese easier to smooth, although you can mix by hand if it is sufficiently softened.
Keep the Greek yogurt and whipped topping refrigerated until needed. Allow only the cream cheese to soften briefly. Check that you have strawberry gelatin dessert mix rather than strawberry drink powder or instant pudding. These products behave differently and cannot be exchanged directly in this recipe.
Step 2: Dissolve the strawberry gelatin.
Empty the small package of sugar-free strawberry gelatin into the heatproof bowl. Pour in ½ cup boiling water and whisk for approximately 2 minutes.
Continue until the powder has completely dissolved, including any grains around the sides or bottom. Proper dissolving is important because undissolved gelatin can leave an unpleasant gritty texture. This recipe intentionally uses less water than a standard gelatin dessert so the mixture can support the yogurt and cream cheese without becoming too loose.
Step 3: Add cold water and cool.
Stir in ½ cup cold water until evenly combined. Let the gelatin mixture cool for approximately 10–15 minutes, checking occasionally.
It should be barely warm and still fully liquid when added to the dairy mixture. Do not pour it in while hot, as heat can soften the dairy mixture and reduce the fluff’s light texture. Equally, avoid leaving it until it starts setting. If it becomes thick or jelly-like, it will be harder to incorporate smoothly.
Step 4: Beat the cream cheese.
Place the softened cream cheese in the large mixing bowl. Beat on medium speed until smooth, scraping down the sides and bottom with a spatula.
Take your time with this step because lumps are easier to remove before the other ingredients are added. The cream cheese should be soft enough to blend but should not be melted or warm. Reduced-fat cream cheese adds the tangy flavor associated with cheesecake while helping give the cups a rich, creamy body.
Step 5: Incorporate the Greek yogurt.
Add the Greek yogurt to the cream cheese in several additions, beating on low speed after each one. Gradually combining the ingredients helps prevent small pieces of cream cheese from remaining in the mixture.
Scrape the bowl again and add the vanilla extract. Mix until the base is smooth and uniform. Use thick Greek yogurt rather than ordinary yogurt, which usually contains more free liquid. If your yogurt has separated in its container, stir it before measuring.
Step 6: Add the cooled strawberry mixture.
With the mixer running on low speed, slowly pour the cooled, liquid gelatin into the cream cheese and yogurt base.
Mix just until everything is evenly pink. Scrape around the bowl to catch any unblended white mixture, then briefly mix again. Work promptly because the cold dairy will begin cooling the gelatin further. Avoid leaving the combined mixture standing for a long time before folding in the topping and portioning it.
Step 7: Fold in the whipped topping.
Add the thawed whipped topping and gently fold it into the strawberry mixture using a spatula. Lift the mixture from the bottom and turn it over the topping, rotating the bowl as you work.
Continue until no large white streaks remain. Avoid vigorous beating at this stage, which can reduce the airiness. The whipped topping lightens the thicker yogurt and cream cheese base. Depending on your brands and the gelatin’s strength, the finished texture may resemble a softly set cheesecake mousse rather than loose whipped cream.
Step 8: Divide among the cups.
Spoon the mixture evenly into six dessert cups. Leave a little space beneath the rims so the lids do not press directly into the surface.
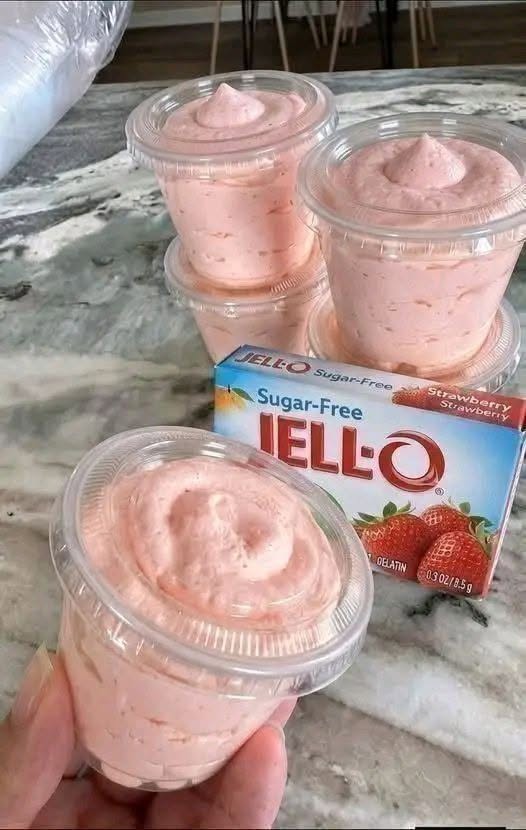
Smooth the tops with the back of a spoon or leave a gentle swirl for a presentation similar to the photo. If you prefer piping, transfer the mixture to a piping bag and portion immediately while it is still soft. Portioning before chilling makes it easier to achieve neat, consistent servings.
Step 9: Refrigerate until softly set.
Cover the cups and refrigerate for at least 2 hours. Larger or deeper portions may need longer to chill completely.
The fluff should become thick enough to hold a spoonful while remaining creamy. Avoid repeatedly stirring it during chilling, which disturbs the developing structure. Check one cup before serving. If the mixture is still loose, give it additional refrigerator time rather than adding more dry gelatin, which would not dissolve properly.
Step 10: Serve chilled.
Serve directly from the refrigerator. Enjoy plain, or add freshly sliced strawberries just before serving if desired.
Optional toppings are not included in the ingredient quantities or protein estimate. A small sprinkle of graham cracker crumbs adds a familiar cheesecake-style finish, while fresh berries bring color and contrast. Keep garnishes separate when preparing cups ahead so they retain their texture.
Tips
Use the correct package size. This recipe is designed for a small strawberry gelatin package. A larger package would change the flavor intensity and firmness.
Soften the cream cheese properly. Cold cream cheese is difficult to blend smoothly, even with a mixer.
Watch the gelatin’s temperature. It should be cooled but liquid before mixing with the dairy.
Thaw whipped topping in the refrigerator. Follow its package instructions rather than heating it to speed up thawing.
Choose thick yogurt. A watery yogurt can make the finished cups less stable.
Taste before adding sweetness. The gelatin and whipped topping already contribute sweet flavor.
Storage
Store the covered cups in the refrigerator for up to 3–4 days. Keep them chilled until serving and use clean utensils.
For snacks throughout the week, prepare a second batch midway through rather than assuming one batch will remain fresh for seven days.
Freezing is not recommended for the best texture. The dairy mixture can separate after thawing, and the fluffy structure may become uneven. If a small amount of liquid appears during refrigeration, gently stir an individual portion before eating.
Serving Ideas
Enjoy a cup as a chilled dessert or sweet afternoon snack. Serve in small glass dishes for guests or use covered food containers for convenient portions.
For a more substantial breakfast, pair a cup with oatmeal or whole-grain toast and fruit. The fluff provides a creamy element, while the accompanying food adds texture and variety.
Nutrition Benefits
Greek yogurt contributes protein and calcium. Cream cheese adds richness and some additional protein, while whipped topping provides the lighter texture.
Estimated protein: Approximately 9–11 grams per cup when divided into six servings. The amount varies by brand, so use the ingredient labels for a more accurate calculation.
Although this recipe uses sugar-free gelatin and topping, dairy contains naturally occurring sugar. The finished cups should not automatically be described as completely sugar-free.
Q&A
Can I use another gelatin flavor?
Yes. Raspberry or cherry works using the same small package size.
Can I omit the cream cheese?
Yes, but the flavor and consistency will change.
Can I add protein powder?
Start with a small amount blended into the yogurt base. It may thicken the mixture or create a chalky texture.
Why are there gelatin pieces?
The gelatin may have partially set before mixing or was not completely dissolved.
Can I use regular whipped topping?
Yes. The recipe will still work, but its sugar and nutritional content will differ.