
Crispy Garlic & Herb Roast Pork – Juicy Pork with Perfect Crackling
Description
Crispy Garlic & Herb Roast Pork is a delicious, restaurant-style dinner featuring tender, juicy pork surrounded by a beautifully golden, crispy crust. Infused with fresh rosemary, thyme, roasted garlic, and aromatic seasonings, this classic pork roast is perfect for Sunday dinners, holiday celebrations, and special family gatherings.
The secret to this recipe is the combination of slow roasting and high-heat finishing, which helps create a flavorful, crunchy exterior while keeping the meat tender and juicy inside.
As the pork roasts, fresh garlic cloves become soft and caramelized, while rosemary and thyme release their wonderful aromas. The natural juices mix with the roasted garlic and herbs, creating a rich pan sauce that complements every slice.
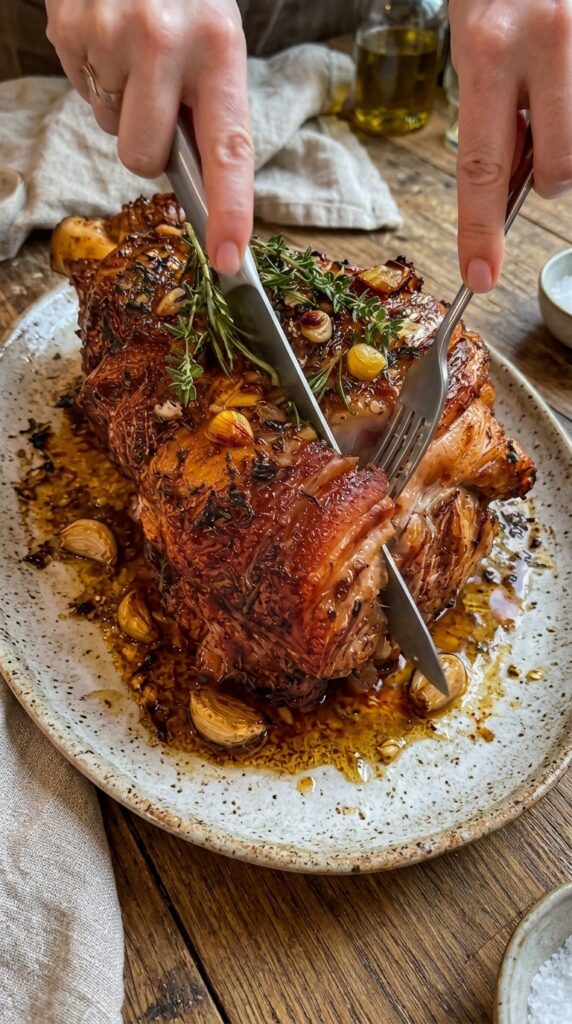
One of the best features of this dish is its beautiful presentation. The roast develops a deep golden-brown crust, and when sliced, it reveals tender, succulent meat underneath.
Although it looks impressive, this recipe is surprisingly simple to prepare. With basic ingredients and a few essential roasting techniques, you can create a flavorful pork dinner that tastes as though it came from a professional kitchen.
Whether you’re preparing a traditional family meal or searching for an impressive holiday centerpiece, Crispy Garlic & Herb Roast Pork is a wonderful choice.
Recipe Information
Ingredients
For the Pork Roast
🍖 4–5 lb skin-on boneless pork shoulder roast
🫒 2 tablespoons olive oil
🧂 1½ teaspoons salt, plus 1 teaspoon for the skin
🌶️ 1 teaspoon freshly ground black pepper
🧄 6 garlic cloves, minced
🌿 2 tablespoons fresh rosemary, finely chopped
🌿 1 tablespoon fresh thyme leaves
🌿 1 teaspoon dried oregano
🌶️ 1 teaspoon smoked paprika
🍋 1 tablespoon fresh lemon juice
For the Roasting Pan
🧄 2 whole garlic bulbs, separated into unpeeled cloves
🧅 1 large onion, thickly sliced
🌿 3 fresh rosemary sprigs
🌿 4 fresh thyme sprigs
🥣 1 cup low-sodium chicken broth
🫒 1 tablespoon olive oil
For the Pan Sauce
1 tablespoon all-purpose flour (optional)
½ cup additional chicken broth, if needed
Salt and pepper to taste
Step-by-Step Instructions
Step 1: Prepare the Pork Roast
🍖 Remove the pork shoulder from its packaging and place it on a clean cutting board.
Pat the entire roast dry using paper towels, paying special attention to the skin.
Dry skin is essential for creating crispy pork crackling.
If the skin is not already scored, use a sharp knife to make shallow cuts approximately ½ inch apart. Cut through the skin and some of the fat, but avoid cutting deeply into the meat.
Scoring allows the fat underneath the skin to render during roasting, helping the surface develop a golden, crunchy texture.
For even better results, place the pork uncovered in the refrigerator overnight to dry the skin. Keep it safely refrigerated during this process.
Step 2: Prepare the Garlic Herb Seasoning
🧄 In a small mixing bowl, combine the minced garlic, chopped rosemary, thyme leaves, dried oregano, smoked paprika, black pepper, lemon juice, and 2 tablespoons of olive oil.
Add 1½ teaspoons of salt and mix until a thick herb paste forms.
The garlic provides savory flavor, while rosemary and thyme create a delicious aroma.
The olive oil helps distribute the seasonings evenly over the pork.
This mixture will flavor the meat beneath the skin while allowing the exposed skin to become crispy.
Step 3: Season the Pork
🌿 Carefully rub the garlic herb mixture over the exposed meat, sides, and underside of the pork shoulder.
If the skin can be lifted safely without detaching it, spread some seasoning underneath the skin.
Avoid coating the outer surface of the skin with wet garlic herb paste because moisture and garlic pieces can interfere with crisping.
Instead, pat the skin dry again and rub approximately 1 teaspoon of salt over its surface and into the scored cuts.
The salt helps draw moisture from the skin and improves the crackling texture during roasting.
Make sure the scored skin remains facing upward.
Step 4: Prepare the Roasting Pan
🧅 Preheat your oven to 450°F (230°C).
Arrange the thick onion slices across the bottom of a large roasting pan.
Scatter the unpeeled garlic cloves, rosemary sprigs, and thyme sprigs around the onions.
Drizzle the vegetables with 1 tablespoon of olive oil.
Place the seasoned pork shoulder on a roasting rack above the vegetables, keeping the skin facing upward.
If you do not have a rack, the onion slices can help elevate the pork, but a rack generally promotes more even airflow.
The garlic and herbs will become aromatic as the pork cooks, creating flavorful pan drippings.
Step 5: Start Roasting at High Heat
🔥 Place the pork in the preheated oven.
Roast at 450°F (230°C) for approximately 25–30 minutes.
This initial high-temperature roasting helps the skin begin to blister and crisp.
Watch the surface carefully.
You should notice the skin becoming firmer and starting to develop a golden appearance.
Avoid opening the oven repeatedly, as this causes temperature fluctuations.
If the skin is browning too quickly, move the roasting pan to a lower oven rack.
Step 6: Reduce the Oven Temperature
🌡️ After the initial roasting period, reduce the oven temperature to 325°F (165°C).
Carefully pour 1 cup of chicken broth into the bottom of the roasting pan, away from the pork skin.
The broth helps prevent the garlic, onions, and drippings from burning.
Continue roasting until the pork reaches your desired level of tenderness.
For sliceable pork shoulder, aim for an internal temperature of approximately 180–190°F (82–88°C). For very soft, pull-apart pork, cook closer to 195–205°F (91–96°C).
Pork is safe at a minimum internal temperature of 145°F (63°C) with a 3-minute rest, but shoulder often benefits from higher temperatures to soften its connective tissue.
A 4–5 lb roast may need approximately 3–4½ hours total, sometimes longer depending on thickness, whether it is boneless, and your oven. Use temperature and tenderness rather than the clock alone.
Step 7: Check the Pork and Pan Juices
🥄 During the roasting process, check the pan occasionally.
If the liquid has evaporated, add a small amount of warm chicken broth to prevent the garlic and onions from burning.
Avoid pouring liquid directly over the skin, because this can soften the crackling.
The pork fat will gradually render, while the garlic cloves become golden and tender.
The rosemary and thyme will infuse the roasting juices with their aromatic flavor.
Use a meat thermometer to monitor the internal temperature.
The meat should feel tender when pierced with a fork or thermometer probe.
Step 8: Finish the Crispy Crackling
✨ Once the pork is tender, inspect the skin.
If the crackling is already golden and crispy, remove the roast from the oven.
If the skin needs additional crisping, raise the oven temperature to 450°F (230°C) for approximately 5–10 minutes.
Watch carefully because the surface can burn quickly.
You can also use the broiler briefly, but the roast must remain far enough from the heating element to prevent burning.
The finished crackling should appear deeply golden, blistered, and crisp.
Step 9: Rest the Pork
🍖 Remove the roast from the oven and transfer it to a cutting board.
Allow the pork to rest for approximately 15–20 minutes before slicing.
Resting helps redistribute the meat juices, which improves tenderness and moisture.
Avoid wrapping crispy crackling tightly in foil because trapped steam can soften it.
Instead, leave the skin exposed while the meat rests.
Step 10: Prepare the Roasted Garlic Pan Sauce
🧄 While the pork rests, carefully remove the roasted garlic cloves from the pan.
Squeeze several softened garlic cloves from their skins into a small saucepan.
Strain the pan juices and skim off excess fat.
Add the flavorful juices to the saucepan along with the roasted garlic.
For a thicker sauce, whisk 1 tablespoon flour with a little cold broth until smooth, then stir it into the simmering liquid.
Cook gently for several minutes until the sauce thickens.
Add more chicken broth if necessary.
Taste and season with salt and black pepper.
The finished sauce should be rich, savory, and full of roasted garlic flavor.
Step 11: Slice and Serve
🔪 Use a sharp knife to carefully slice the crispy skin and tender pork into serving portions.
For particularly hard crackling, it may be easier to remove the crispy skin first and cut it separately.
Arrange the sliced pork on a large serving platter.
Garnish with fresh rosemary, thyme, and roasted garlic cloves.
Serve the warm pan sauce alongside the roast rather than pouring it over the crackling.
This keeps the crust beautifully crispy while allowing everyone to enjoy the flavorful sauce.
Why You’ll Love This Recipe
1. Beautiful Crispy Crackling
The combination of dry skin, salt, and high-heat roasting produces a delicious golden crust.
The crunchy exterior contrasts beautifully with the tender pork underneath.
2. Rich Garlic and Herb Flavor
Fresh garlic, rosemary, thyme, and oregano create an aromatic seasoning that complements the pork.
These ingredients add depth without requiring complicated preparation.
3. Perfect for Special Occasions
This roast makes an impressive centerpiece for Sunday dinners, family celebrations, and holiday gatherings.
4. Simple Ingredients
You only need pork, garlic, herbs, seasonings, and a few kitchen essentials to create a delicious meal.
5. Delicious Leftovers
Leftover pork can be used in sandwiches, wraps, rice bowls, or hearty salads.
Expert Tips for Perfect Crispy Roast Pork
Choose skin-on pork shoulder. Pork shoulder contains fat and connective tissue that help the meat remain flavorful during longer roasting.
Dry the skin thoroughly. Moisture is one of the biggest obstacles to creating crunchy pork crackling.
Score the skin carefully. Shallow cuts help the fat render without exposing too much meat.
Keep wet seasonings off the skin. Apply the garlic herb mixture mainly to the meat underneath and around the sides.
Use a meat thermometer. Temperature and tenderness are more reliable than cooking time alone.
Avoid pouring sauce over the crackling. Liquid will soften the crispy exterior.
Rest before carving. Resting helps retain moisture and makes the roast easier to slice.
Delicious Recipe Variations
Lemon Rosemary Roast Pork
Add 1 tablespoon fresh lemon zest to the garlic herb seasoning.
The lemon provides a bright flavor that complements rosemary beautifully.
Garlic Parmesan Pork Roast
Add a little grated Parmesan cheese to the herb mixture applied to the meat, keeping it away from the exposed skin.
The cheese adds extra savory richness.
Spicy Herb Roast Pork
Add ½ teaspoon crushed red pepper flakes or cayenne pepper to the seasoning mixture.
This gives the pork a mild spicy kick.
Honey Garlic Roast Pork
Brush a small amount of honey garlic glaze over the exposed meat during the final 10 minutes of roasting.
Avoid glazing the crackling, as the sugar can burn and the moisture can soften the skin.
What to Serve with Crispy Garlic & Herb Roast Pork
Crispy garlic herb roast pork pairs beautifully with classic comfort-food side dishes.
Creamy mashed potatoes are a wonderful choice because they absorb the rich roasted garlic pan sauce.
Roasted carrots, green beans, and Brussels sprouts add freshness and color to the meal.
For a traditional Sunday dinner, serve the pork with buttery roasted potatoes and homemade gravy.
A fresh green salad with lemon dressing provides a refreshing contrast to the rich meat.
Warm dinner rolls or crusty bread are also delicious for soaking up the pan juices.
Storage and Reheating Instructions
Refrigerator
Allow leftover pork to cool slightly before transferring it to airtight containers.
Refrigerate within 2 hours of cooking and consume within 3–4 days.
Store the crackling separately from the meat if possible.
Freezer
Place cooled pork portions in freezer-safe containers or bags.
Freeze for approximately 2–3 months for best quality.
Crispy skin does not always retain its original texture after freezing.
Reheating
Place the sliced pork in an oven-safe baking dish with a small amount of broth.
Cover loosely with foil and warm in a 325°F (165°C) oven until the pork reaches 165°F (74°C).
Reheat the crackling separately in a hot oven or air fryer until crisp, taking care not to burn it.
Nutritional Information
Estimated per serving, based on 8 servings. Actual values depend greatly on the cut, fat trimming, portion size, and amount of crackling consumed.
| Nutrient | Approximate Amount |
|---|---|
| Calories | 560 kcal |
| Protein | 48 g |
| Carbohydrates | 4 g |
| Total Fat | 39 g |
| Saturated Fat | 13 g |
| Fiber | 1 g |
| Sodium | 650 mg |
Health Benefits
Rich in Protein
Pork provides protein, which supports muscle maintenance, tissue repair, and normal body functions.
Contains Important Vitamins
Pork contains several B vitamins, including thiamin, vitamin B6, and vitamin B12, which help support normal energy metabolism.
Source of Essential Minerals
Pork provides zinc, selenium, and phosphorus, important nutrients for normal immune function and overall health.
Homemade Ingredient Control
Preparing this roast at home allows you to control the salt, seasonings, and added fats.
Because pork shoulder and crackling can be high in saturated fat, moderate portions alongside plenty of vegetables make a more balanced meal.
Frequently Asked Questions (Q&A)
Q1: What is the best cut of pork for crispy roast pork?
Skin-on pork shoulder is an excellent choice because it contains enough fat to produce flavorful, tender meat and crispy crackling.
Q2: How do I make pork crackling extra crispy?
Dry the skin thoroughly, score it carefully, rub it with salt, and start roasting at a high temperature. Keep moisture and wet seasonings away from the skin.
Q3: Can I prepare the pork in advance?
Yes. You can season the meat and refrigerate the roast uncovered overnight. This also helps dry the skin before roasting.
Q4: Why is my pork crackling soft?
The skin may contain too much moisture, the oven may not be hot enough, or the crust may have been exposed to steam after roasting.
Q5: Can I use pork loin instead of pork shoulder?
Yes, but pork loin is much leaner and requires a different roasting approach. Cook it to 145°F (63°C), followed by a 3-minute rest, rather than using the higher temperatures recommended for tender pork shoulder.
Final Thoughts
Crispy Garlic & Herb Roast Pork with Rosemary and Roasted Garlic is a comforting, flavorful, and impressive dish that deserves a place on your family dinner menu.
With its beautifully golden crackling, tender meat, aromatic herbs, and rich roasted garlic sauce, this recipe offers the perfect combination of crispy texture and juicy flavor.
It’s an excellent choice for weekend cooking, holiday gatherings, and special occasions when you want to serve something memorable.
By using fresh ingredients, carefully drying the skin, and following the proper roasting method, you can create a delicious homemade pork roast that looks and tastes wonderful.
Serve it with creamy mashed potatoes, roasted vegetables, and warm garlic pan sauce for a complete meal everyone can enjoy.