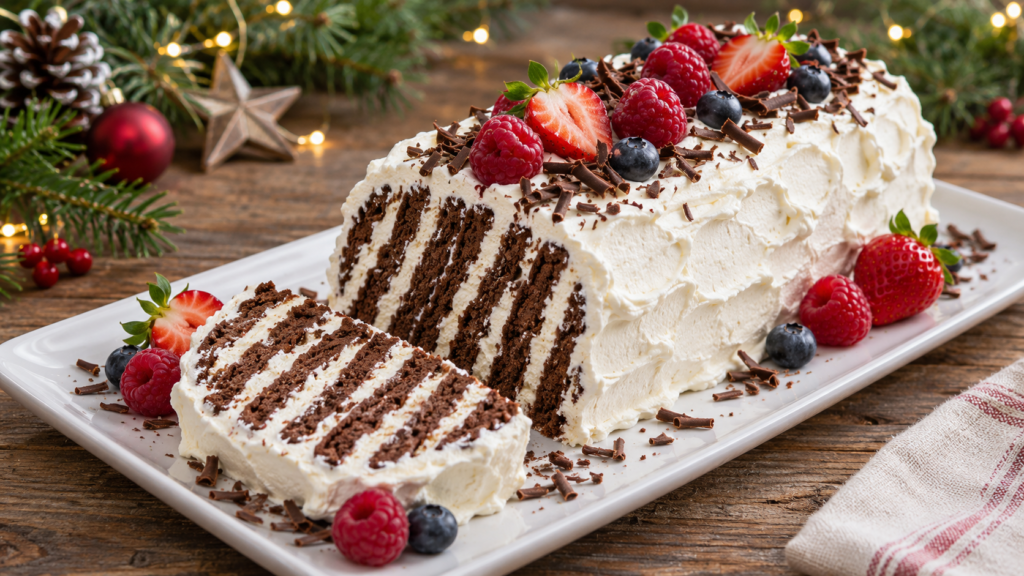

Christmas Chocolate Ripple Cake
Prep Time: 25 minutes
Cook Time: 0 minutes
Chill Time: 8–12 hours
Servings: 10
Course: Dessert
Method: No-bake
Cuisine: Australian-inspired
Description for Christmas Chocolate Ripple Cake
Christmas Chocolate Ripple Cake is an easy, creamy dessert made with chocolate biscuits and whipped cream. As the cake rests in the refrigerator, the biscuits absorb moisture from the cream and soften into tender, cake-like layers. A simple coating of whipped cream and a topping of fresh berries turn it into a beautiful Christmas dessert.
The finished cake looks impressive, but putting it together takes very little effort. You do not need an oven, a cake pan, or a long list of baking ingredients. Simply sandwich the biscuits with cream, arrange them into a log, cover, and refrigerate overnight.
When sliced diagonally, the cake reveals its lovely chocolate-and-cream stripes. Strawberries, raspberries, and chocolate shavings add festive color and make every slice feel special.
Ingredients for Christmas Chocolate Ripple Cake
For the two-ingredient cake base
250 g chocolate ripple biscuits
600 ml cold heavy whipping cream, about 2½ cups
Optional flavor additions
2 tablespoons powdered sugar
1 teaspoon vanilla extract
For the Christmas topping
½ cup fresh strawberries, halved
½ cup fresh raspberries
¼ cup fresh blueberries
2 tablespoons dark chocolate shavings
The biscuits and cream are the only essential ingredients. Sugar, vanilla, fruit, and chocolate are optional additions for flavor and decoration.
Equipment
Electric hand mixer or stand mixer
Large mixing bowl
Long serving platter
Spatula or butter knife
Large sharp knife
Cake cover or a deep container
Instructions for Christmas Chocolate Ripple Cake
1. Prepare your ingredients
Keep the whipping cream refrigerated until you are ready to use it. Wash the berries and dry them carefully with paper towels. Set the berries aside for decorating after the cake has chilled.
Choose a platter long enough to hold the biscuit log. Assemble the cake directly on this platter so you will not need to move it later.
2. Whip the cream
Pour the cold cream into a large mixing bowl. Add the powdered sugar and vanilla, if using.
Beat on medium speed until the cream forms firm peaks. It should hold its shape when you lift the beaters while still looking smooth. Stop before it becomes grainy or starts separating.
3. Make a cream base
Spread a narrow strip of whipped cream along the center of the platter. This creates a base that helps keep the biscuits upright.
Reserve approximately half the whipped cream for covering the outside of the assembled cake.
4. Sandwich the biscuits
Spread about 1–2 teaspoons of whipped cream onto one biscuit. Gently press another biscuit against it.
Continue adding cream and biscuits, building a short stack. Avoid pressing too firmly, which can squeeze out the filling or break the biscuits.
5. Form the cake log
Lay the short stack on its side on the cream base so the biscuits stand vertically like books on a shelf.
Continue attaching cream-covered biscuits to one end until you have a long log. Keep the biscuits aligned and use a little cream underneath wherever extra support is needed.
6. Cover with whipped cream
Spread the reserved cream over the top, sides, and ends. Cover the biscuits completely so the exposed edges can soften.
Use a spatula to make soft swirls across the surface. A relaxed, homemade finish suits this cake beautifully.
7. Refrigerate overnight
Place the cake under a cake cover or inside a deep container. Refrigerate for 8–12 hours.
This resting time is essential. It allows the crisp biscuits to absorb moisture and develop a soft texture that slices easily.
8. Add the Christmas toppings
Shortly before serving, arrange the dried berries along the top. Scatter over the chocolate shavings.
Leave some white cream visible between the berries for a simple festive finish. Keep the topping light enough that it does not squash the cake.
9. Slice diagonally and serve
Use a sharp knife to cut across the log at roughly a 45-degree angle. This reveals several alternating biscuit and cream layers in each slice.
Wipe the knife between cuts for a cleaner presentation. Serve chilled, using a cake server to support each delicate portion.
Recipe Notes for Christmas Chocolate Ripple Cake
Choose the right biscuits
Chocolate ripple biscuits give this dessert its familiar flavor and texture. If they are unavailable, use plain, crisp chocolate biscuits without a cream filling.
Different biscuits absorb moisture at different rates. Thick or very hard biscuits may need a longer chilling time, while thin chocolate wafers can soften more quickly.
Use cream suitable for whipping
Choose heavy whipping cream with approximately 35% milk fat or higher. Pouring cream with a low fat content may not whip firmly enough to support the cake.
The cream should be cold before beating. A chilled bowl can also make whipping easier in a warm kitchen.
Adjust the sweetness
Chocolate biscuits already contain sugar, so the cake works well with unsweetened whipped cream. Add the optional powdered sugar if you prefer a sweeter dessert.
Taste the cream before assembling, keeping in mind that it will be eaten with sweet biscuits and fruit.
Allow enough resting time
The most common reason for crunchy layers is insufficient chilling. Overnight refrigeration gives a more even result than a short rest.
If you are making this dessert for Christmas lunch, assemble it the evening before and decorate it the next morning.
Tips for the Best Christmas Chocolate Ripple Cake
Keep the filling even: Similar amounts of cream between each biscuit help the layers soften consistently.
Handle biscuits gently: Small cracks are usually hidden by the cream, but intact biscuits are easier to arrange.
Keep everything cool: Work away from a hot stove or direct sunlight so the whipped cream stays firm.
Dry the berries: Water on the fruit can run into the cream and affect the finish.
Decorate before serving: Fresh fruit looks its best when added after the overnight rest.
Cut at an angle: A straight cut between biscuits will not show the same attractive striped pattern.
Plan your platter: Leave enough room around the cake for slicing and lifting each portion.
Serving Suggestions for Christmas Chocolate Ripple Cake
Serve Christmas Chocolate Ripple Cake straight from the refrigerator, with extra berries alongside. Its creamy texture pairs nicely with coffee, tea, or a small glass of cold milk.
For a dessert buffet, cut modest slices so guests can try other sweets too. You can also make two shorter logs instead of one long cake, which may fit your refrigerator more easily.
For a simple Christmas presentation, arrange the berries in a line along the top and scatter chocolate shavings around them. The red fruit, white cream, and dark chocolate provide plenty of decoration without extra frosting.
Storage and Make-Ahead Notes
Assemble the undecorated cake one day ahead and keep it covered in the refrigerator. Add fresh berries and chocolate just before serving.
Refrigerate leftovers promptly in a covered container and enjoy within two days for the best texture. The biscuits continue softening as the cake sits, and the fruit may release juice.
Freezing can change the texture of whipped cream and fresh berries, so refrigeration is the better choice for this version. If you need a smaller dessert, halve the ingredients and make a shorter log.
Estimated Nutritional Information for Christmas Chocolate Ripple Cake
Per serving, based on 10 servings, including the optional sugar, vanilla, berries, and chocolate:
Calories: Approximately 360
Protein: 4 g
Carbohydrates: 27 g
Total fat: 27 g
Saturated fat: 16 g
Fiber: 2 g
Sugar: 15 g
These figures are estimates. Biscuit brands, cream fat content, toppings, and portion sizes will change the final values. Use your ingredient labels for a more precise calculation.
Benefits of This Recipe
A short ingredient list
The basic cake needs just chocolate biscuits and cream. You can keep it simple or add festive toppings using ingredients you already have.
No oven required
This dessert frees up oven space when you are preparing a holiday meal. It is also convenient during warm-weather Christmas celebrations.
Easy to make ahead
Most of the work happens the day before serving. On the day, you only need to decorate and slice.
Beginner-friendly preparation
There is no batter to mix or baking time to judge. Whipping the cream and allowing enough chilling time are the main steps to get right.
Flexible decoration
Berries and chocolate make a colorful topping, but you can use fewer decorations without changing the basic recipe.
This is a rich celebration dessert. The benefits above relate to convenience and preparation rather than making it a low-calorie food.
Discover 60+ high-protein, low-carb recipes with simple instructions and everyday ingredients. Find breakfast, lunch, dinner, salad, and snack ideas—plus a 30-day meal plan to help you plan ahead.
Explore the Elite Protein Kitchen Cookbook
Questions and Answers for Christmas Chocolate Ripple Cake
Why is it called Chocolate Ripple Cake?
The name comes from the chocolate ripple biscuits traditionally used to make it. The alternating biscuits and cream create a striped appearance when sliced diagonally.
Does it really need no baking?
Yes. The biscuits are already baked. Refrigeration softens them as they absorb moisture from the whipped cream.
Can I use sandwich cookies?
They behave differently because of their filling and may create a sweeter, heavier cake. Plain chocolate biscuits are a closer substitute.
Why is my cake still crunchy?
It may need more time in the refrigerator, or the biscuits may be unusually thick. Make sure each biscuit has cream against it and allow a full overnight rest.
Can I leave out the sugar and vanilla?
Yes. Both are optional. The biscuits provide sweetness and chocolate flavor on their own.
Can I make individual portions?
Yes. Sandwich a few biscuits with cream to make small logs. Cover them with cream, refrigerate overnight, and decorate before serving.
Can I make it gluten-free?
Use suitable gluten-free chocolate biscuits and check the labels of every additional ingredient. The chilling time may vary with the biscuits.https://ketosl.com/pizza-grilled-cheese-sandwich/