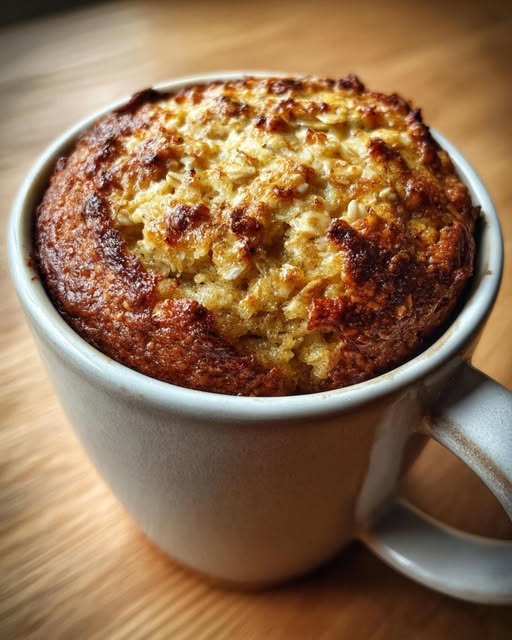

Banana Oat Microwave Mug Cake
Prep Time: 5 minutes
Cook Time: 1½–3 minutes, depending on your microwave
Rest Time: 2 minutes
Servings: 1 generous portion
Equipment: Large microwave-safe mug, mixing bowl, fork, and measuring spoons
Ingredients for Banana Oat Microwave Mug Cake
1 ripe banana, mashed thoroughly
¼ cup rolled oats or quick oats
¼ cup milk, dairy or non-dairy
1 tablespoon honey or maple syrup
½ teaspoon baking powder
½ teaspoon vanilla extract
Instructions
Step 1: Choose a suitable mug.
Use a microwave-safe mug with a capacity of at least 16 oz (475 ml). A wide mug allows the mixture to cook more evenly than a narrow, deep cup. Check that it has no metallic decoration and is suitable for microwave use.
The batter should fill the mug no more than halfway to two-thirds full. Banana sizes vary, so if your mixture sits too high, use a larger microwave-safe bowl. Leaving space helps prevent the batter from overflowing as the baking powder activates.
Step 2: Prepare the oats.
For the softest texture, use quick oats. They absorb liquid more readily and blend into the mashed banana without leaving large flakes.
Regular rolled oats also work, but the finished cake will have a heartier, more noticeable oat texture. For a smoother result, grind the measured oats into a coarse flour using a blender or small food processor. Measure the oats before grinding so the amount remains consistent. Steel-cut oats are unsuitable for this short cooking method because they require substantially longer to soften.
Step 3: Mash the banana thoroughly.
Peel the ripe banana and place it in a mixing bowl. Mash with a fork until mostly smooth, breaking up any large pieces.
A banana with brown spots is usually easier to mash and contributes more sweetness than a firm, barely ripe banana. Small soft lumps are fine, but large chunks can create uneven pockets of moisture. A medium banana works well; a very large banana will make the cake wetter and may require extra cooking time.
Step 4: Add the liquid ingredients.
Stir the milk, honey or maple syrup, and vanilla extract into the mashed banana. Mix until the sweetener is evenly distributed.
Dairy milk, soy milk, oat milk, or almond milk can all be used. Their flavors and protein contents differ, but each supplies the moisture needed for the oats. If using honey, stir carefully so it does not remain in a sticky pocket at the bottom. The mixture should look loose and creamy at this stage.
Step 5: Add the oats and baking powder.
Add the oats and sprinkle the baking powder evenly across the mixture. Stir thoroughly, scraping the sides and bottom of the bowl.
Distributing the baking powder matters because concentrated pockets can taste unpleasant and produce uneven rising. Mix until all the oats are moistened and no dry powder remains visible. This batter is naturally softer than a traditional flour-based cake batter. It contains no egg or wheat flour, so the finished texture will be moist and spoonable rather than dry and sponge-like.
Step 6: Allow the oats to hydrate briefly.
Let the batter stand for approximately 1–2 minutes while you prepare your microwave and serving area. This gives the oats a little time to absorb the liquid.
Quick oats or ground oats may thicken slightly during this rest. Whole rolled oats will remain more distinct. A short rest is sufficient; you do not need to refrigerate or soak the batter for hours. Stir once more before transferring it so the banana and oats remain evenly distributed.
Step 7: Transfer to the mug.
Spoon the mixture into your large microwave-safe mug. Scrape the bowl to transfer the ingredients, then smooth the surface lightly.
Check the fill level again before cooking. Place the mug on a microwave-safe plate if you would like to catch any unexpected overflow. Keep the mug upright and avoid placing a lid over it. The mixture needs room to expand, and an uncovered surface lets some steam escape during cooking.
Step 8: Microwave in short intervals.
Microwave on HIGH for 90 seconds, then check the cake. Continue in 20–30-second intervals if the center still looks liquid.
Total cooking time may fall between 1½ and 3 minutes, depending on microwave wattage, mug shape, oat type, and banana size. The surface should look mostly set, and the center should be soft without a pool of uncooked batter. Some moisture is expected. Avoid waiting for it to become completely dry, as the outer edges may turn rubbery before that happens.
Step 9: Rest before checking the texture.
Carefully remove the mug using an oven mitt or folded towel. Both the mug and its contents may be very hot.
Let stand for 2 minutes. During this time, the oats continue absorbing moisture and the cake becomes slightly firmer. Check the center with a spoon after resting. If it remains liquid beneath the surface, microwave for another short interval and rest again. Judge the result as a soft oat cake rather than expecting the crumb of an oven-baked sponge.
Step 10: Finish and serve.
Enjoy directly from the mug while warm. Add toppings after cooking so they retain their texture and do not interfere with the batter’s rise.
Banana slices, a spoonful of Greek yogurt, cinnamon, or peanut butter are options. These are optional additions and are not included in the ingredient list. If serving to someone else, remind them that the mug may remain hot even after the resting period.
Tips
Check early. A powerful microwave may cook the cake faster than expected.
Choose quick oats for softness. Rolled oats create a more substantial, oatmeal-like texture.
Use a roomy mug. A small coffee cup can overflow before the center cooks.
Mash well. Evenly mashed banana helps the batter cook consistently.
Avoid overcooking. Short finishing intervals give you better control.
Expect a moist result. With these ingredient proportions, the cake resembles soft baked oatmeal.
Use fresh baking powder. Old baking powder may provide little lift.
Adjust sweetness next time. A very ripe banana may make the full tablespoon of sweetener unnecessary for your taste.
Storage
This mug cake tastes best freshly prepared, when it is warm and soft. Refrigerate any leftovers in a covered container for up to 2 days.
To reheat, add a small splash of milk and microwave in short intervals until warm throughout. The oats will absorb more liquid during storage, so the cake may become denser.
For convenient preparation, measure the dry ingredients ahead, then add the banana, milk, sweetener, and vanilla immediately before cooking.
Serving Ideas
Serve with Greek yogurt for a creamy contrast or peanut butter for a richer finish. Fresh berries add brightness, while chopped nuts provide crunch.
For breakfast, pair it with your preferred drink and an additional protein source if desired. For dessert, enjoy a smaller portion with yogurt and a light drizzle of maple syrup.
Optional toppings change the sweetness, calories, and overall nutritional content.
Nutrition Benefits
Oats contribute fiber, including beta-glucan, while banana provides potassium and carbohydrates. Milk adds nutrients that vary with the variety chosen.
Dairy and soy milk generally contribute more protein than many almond or oat drinks. Honey and maple syrup add sweetness and count as added sugars.
This recipe is not automatically high in protein. Greek yogurt or another protein-rich accompaniment can make the complete meal more substantial.
Q&A
Can I leave out the honey or maple syrup?
Yes. A very ripe banana may provide enough sweetness.
Can I use water instead of milk?
Yes, although the result will be less creamy.
Why is my cake rubbery?
It may have cooked too long. Use shorter intervals next time.
Can I double the recipe?
Prepare two separate mugs for more reliable cooking.
Is it gluten-free?
Use certified gluten-free oats and check the remaining ingredient labels.
Why did it barely rise?
This moist, egg-free mixture has limited lift. Oat texture and baking powder freshness also affect the result.