
No-Bake Peanut Butter Balls – Don’t Lose This Recipe
Description
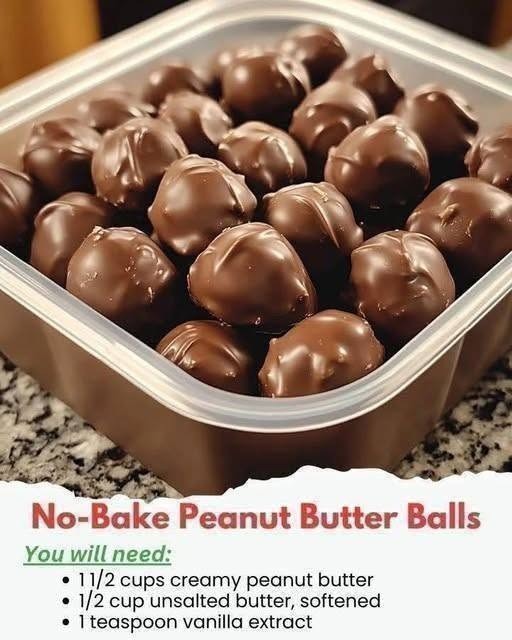
No-Bake Peanut Butter Balls are an irresistibly creamy, sweet, and satisfying homemade treat that comes together without turning on the oven. Made with creamy peanut butter, softened butter, vanilla, powdered sugar, and a few simple pantry ingredients, these bite-sized treats are perfect for holidays, parties, cookie trays, afternoon snacks, or whenever a peanut butter craving strikes.
The texture is rich and creamy on the inside with a soft, slightly crumbly bite that melts in your mouth. You can enjoy them plain, roll them in coconut or finely chopped nuts, or dip them in melted chocolate for an extra indulgent finish.
One of the best things about this recipe is how easy it is. There is no complicated baking technique, no special equipment, and no need to wait for dough to rise. Simply mix the ingredients, shape the mixture into balls, chill them, and enjoy.
These peanut butter balls are also a wonderful make-ahead dessert. Prepare a batch in advance and keep them refrigerated so you always have a homemade treat ready to serve.
Ingredients
For the Peanut Butter Mixture
- 1 1/2 cups creamy peanut butter
- 1/2 cup unsalted butter, softened
- 1 teaspoon vanilla extract
- 3 cups powdered sugar
- 1/4 teaspoon salt
For the Optional Chocolate Coating
- 2 cups semi-sweet chocolate chips
- 1 tablespoon coconut oil or shortening, optional
Optional Toppings
- Finely chopped peanuts
- Unsweetened shredded coconut
- Flaky sea salt
- Mini chocolate chips
- Crushed pretzels
- Holiday sprinkles
Instructions
1. Prepare the Peanut Butter Mixture
Place the softened unsalted butter in a large mixing bowl.
Using a hand mixer, stand mixer, or sturdy wooden spoon, beat the butter until smooth and creamy.
Add the creamy peanut butter and continue mixing until the butter and peanut butter are completely combined.
Add the vanilla extract and salt. Mix again until everything is evenly incorporated.
The mixture should be smooth, creamy, and thick.
2. Add the Powdered Sugar
Gradually add the powdered sugar, about 1/2 cup at a time, while mixing continuously.
Adding the sugar gradually helps prevent a large cloud of powdered sugar from forming and makes the mixture easier to combine.
Continue mixing until all of the powdered sugar has been incorporated.
The finished mixture should be thick enough to hold its shape when pressed together.
If the mixture feels too soft or sticky, add another tablespoon or two of powdered sugar.
If it feels extremely dry or crumbly, add a small spoonful of peanut butter and mix again.
3. Chill the Mixture
Cover the bowl and refrigerate the peanut butter mixture for approximately 20–30 minutes.
Chilling makes the mixture firmer and much easier to roll.
This step is especially helpful if your kitchen is warm or your peanut butter is particularly soft.
4. Shape the Peanut Butter Balls
Line a large baking sheet or tray with parchment paper.
Using a small cookie scoop or tablespoon, portion out the mixture.
Roll each portion gently between your palms until it forms a smooth ball.
Aim for approximately 1-inch balls so they are easy to eat and have a good peanut butter-to-chocolate ratio if you decide to coat them.
Place each finished ball onto the prepared parchment-lined tray.
Continue until all of the mixture has been shaped.
5. Chill Again
Place the tray in the refrigerator for another 20–30 minutes.
This firms up the peanut butter balls and makes them easier to dip in chocolate.
For an even firmer texture, you can place them in the freezer for approximately 10–15 minutes instead.
6. Prepare the Chocolate
If you are making chocolate-coated peanut butter balls, place the chocolate chips in a microwave-safe bowl.
Heat in 20–30-second intervals, stirring thoroughly between each interval.
Continue until the chocolate is mostly melted, then stir until completely smooth.
If desired, add 1 tablespoon of coconut oil or shortening to create a smoother, slightly thinner coating.
Be careful not to overheat the chocolate, as it can become thick or seize.
7. Dip the Peanut Butter Balls
Using a fork or dipping tool, place one chilled peanut butter ball into the melted chocolate.
Roll it gently until coated.
Lift it out and allow excess chocolate to drip back into the bowl.
Place the coated ball back onto the parchment-lined tray.
Repeat with the remaining peanut butter balls.
8. Add Optional Toppings
If using chopped peanuts, coconut, sprinkles, or flaky sea salt, add them immediately after dipping each ball.
The toppings need to be added while the chocolate is still melted so they stick properly.
You can also drizzle the finished balls with additional melted chocolate for a decorative finish.
9. Chill Until Set
Place the tray in the refrigerator for approximately 20–30 minutes, or until the chocolate coating has completely hardened.
Once set, transfer the peanut butter balls to an airtight container.
Keep refrigerated until ready to serve.
Notes
Use creamy peanut butter for the smoothest texture. Traditional shelf-stable peanut butter generally works well for this recipe.
Natural peanut butter can also be used, but make sure it has been thoroughly stirred before measuring. Excess oil can make the mixture too soft.
The butter should be softened but not melted. Melted butter can make the mixture greasy and difficult to shape.
Powdered sugar provides both sweetness and structure. Add it gradually and adjust slightly depending on the consistency of your mixture.
For a less sweet version, start with 2 1/2 cups powdered sugar and add more as needed until the mixture reaches the desired consistency.
The chocolate coating is optional. The peanut butter balls are delicious on their own, but chocolate creates the classic combination of peanut butter and chocolate.
Tips for the Best No-Bake Peanut Butter Balls
Use softened butter: room-temperature butter blends smoothly with peanut butter and helps create a creamy filling.
Chill before rolling: If the mixture sticks to your hands, refrigerate it for another 10–15 minutes.
Don’t add all the sugar at once: Gradual additions make it easier to control the texture.
Keep the balls uniform: using a small cookie scoop helps create evenly sized treats.
Avoid overheating chocolate: microwave the chocolate in short intervals and stir frequently.
Use parchment paper: this prevents the finished treats from sticking to the tray.
Work quickly with chocolate: Keep the peanut butter balls chilled and dip them in small batches.
Add toppings immediately: nuts, coconut, and sprinkles need to be added before the chocolate sets.
Make them extra crunchy: Mix finely chopped roasted peanuts into the peanut butter mixture before shaping.
Add a salty finish: a tiny pinch of flaky sea salt on the chocolate coating creates a delicious sweet-and-salty contrast.
Servings
This recipe makes approximately 30–36 peanut butter balls, depending on the size you make them.
For party serving, plan on 2–3 balls per person.
For a holiday dessert tray, make smaller balls so the recipe produces more bite-sized treats.
Nutritional Information
Approximate nutrition per peanut butter ball, assuming 36 balls and including the peanut butter mixture but not the optional chocolate coating:
- Calories: approximately 145
- Protein: approximately 3 g
- Carbohydrates: approximately 13 g
- Fat: approximately 9 g
- Saturated Fat: approximately 3 g
- Fibre: approximately 1 g
- Sugar: approximately 10 g
- Sodium: approximately 80 mg
If chocolate coating is added, the calories, carbohydrates, sugar, and fat will increase.
Nutrition values are estimates and can vary depending on the peanut butter, butter, powdered sugar, chocolate, and portion size used.
Benefits
Contains protein: Peanut butter provides plant-based protein that can help make these treats more satisfying than many simple candies.
Provides healthy fats: Peanut butter contains predominantly unsaturated fats, while the overall recipe provides a rich and satisfying texture.
Quick preparation: Because these treats require no baking, they can be prepared quickly with minimal kitchen equipment.
Make-ahead friendly: Peanut butter balls store well in the refrigerator, making them convenient for parties and gatherings.
Simple ingredients: The basic recipe uses common ingredients that are easy to keep in your pantry.
Customisable: You can change the coating and toppings to create different flavours for holidays, birthdays, or special occasions.
Keep in mind that these are still a sweet dessert, so they are best enjoyed as a treat rather than as a substitute for a balanced meal.
Recipe Q&A
Do I have to use creamy peanut butter?
No, but creamy peanut butter gives the smoothest and most consistent texture. Crunchy peanut butter can be used if you enjoy pieces of peanuts throughout the filling.
Can I use natural peanut butter?
Yes. Make sure to stir the natural peanut butter very well before measuring. If it is especially oily, the mixture may require a little additional powdered sugar to become firm enough to roll.
Can I make these without chocolate?
Absolutely. The peanut butter balls taste delicious without any coating. You can simply roll them in finely chopped peanuts or coconut or leave them plain.
Why is my mixture too sticky?
The peanut butter may be warm or contain more oil than expected. Refrigerate the mixture for 20–30 minutes first. If it remains too soft, gradually add a little more powdered sugar.
Why is my mixture too dry?
You may have added too much powdered sugar. Mix in a tablespoon of peanut butter at a time until the mixture becomes soft enough to hold together.
Can I use salted butter?
Yes. If you use salted butter, reduce or omit the additional salt in the recipe.
Can I use another type of chocolate?
Yes. Milk chocolate, dark chocolate, white chocolate, or semi-sweet chocolate can all be used.
How long do peanut butter balls last?
Stored in an airtight container in the refrigerator, they can generally be enjoyed for about 1–2 weeks.
Can I freeze them?
Yes. Place the peanut butter balls in a freezer-safe airtight container, separating layers with parchment paper. Freeze for up to approximately 2–3 months for best quality.
Thaw them in the refrigerator before serving.
Can I make these for Christmas?
Definitely. Chocolate-coated peanut butter balls are excellent for holiday cookie trays. Add red and green sprinkles, crushed peppermint, or a drizzle of white chocolate for a festive appearance.
Can children help make this recipe?
Yes. Rolling the chilled mixture into balls and adding toppings can be a fun kitchen activity. Young children should have adult supervision, particularly around melted chocolate and kitchen appliances.
Can I make smaller peanut butter balls?
Yes. Smaller balls are perfect for dessert trays or parties. Reduce the portion size and adjust the total yield accordingly.
How should I store them?
Keep the finished peanut butter balls in an airtight container in the refrigerator. Place parchment paper between layers if they have a chocolate coating.
Make-Ahead Instructions
These treats are ideal for preparing ahead of time.
Prepare the peanut butter mixture and shape the balls up to a day before serving. Store them covered in the refrigerator.
You can also coat them in chocolate ahead of time and keep them refrigerated until you’re ready to serve.
For longer storage, freeze the prepared balls in an airtight freezer-safe container. When you’re ready to enjoy them, transfer them to the refrigerator and allow them to thaw gradually.
Variations
Chocolate Peanut Butter Balls
Use semi-sweet or dark chocolate for the coating and finish with a small sprinkle of flaky sea salt.
Coconut Peanut Butter Balls
Add 1/2 cup finely shredded coconut to the peanut butter mixture or roll the finished balls in coconut before serving.
Crunchy Peanut Butter Balls
Use crunchy peanut butter and add a handful of finely chopped roasted peanuts to the mixture.
Pretzel Peanut Butter Balls
Roll the chocolate-coated balls in finely crushed pretzels for a salty, crunchy finish.
Dark Chocolate Version
Use dark chocolate for a richer, less-sweet chocolate coating that contrasts beautifully with the sweet peanut butter center.
Final Serving Idea
Arrange the finished No-Bake Peanut Butter Balls on a decorative serving platter and drizzle a little extra melted chocolate over the top. Add a light sprinkle of chopped peanuts or flaky sea salt for an attractive finish.
Serve them chilled alongside coffee, tea, hot chocolate, or as part of a holiday dessert spread.
These creamy peanut butter treats are simple, nostalgic, and incredibly easy to make. With no oven required and plenty of opportunities for customization, they’re the kind of recipe you’ll want to keep handy whenever you need a quick homemade dessert.