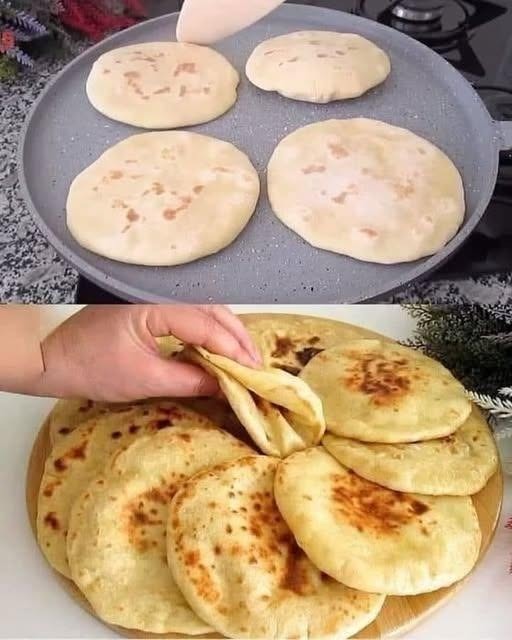

10-Minute No-Oven Yogurt Flatbread
Recipe Description
This easy 10-minute no-oven yogurt flatbread is soft, warm, and wonderfully satisfying, and the best part is that you don’t need an oven. Made with simple pantry ingredients, this homemade bread can be cooked directly in a skillet on the stovetop.
The yogurt gives the dough a tender texture while helping create a pleasantly soft center. The bread develops lightly golden spots on the outside as it cooks, making it perfect for serving with soups, curries, grilled meats, eggs, vegetables, dips, or simply enjoying warm with butter.
If you’re looking for a quick homemade bread recipe for busy mornings or unexpected guests, this stovetop flatbread is an excellent option.
Prep Time: 5 minutes
Cook Time: 5–8 minutes
Total Time: 10–15 minutes
Servings: 8–10 flatbreads
Ingredients
For the Bread
4 cups (480 g) all-purpose flour
1 cup (220 g) plain yogurt
1 cup (200 ml) water, approximately
1 teaspoon salt
2 teaspoons baking powder
2 tablespoons olive oil or melted butter
Extra flour for rolling
Extra oil or butter for cooking
Optional Garlic-Herb Topping
2 tablespoons melted butter
1 clove garlic, finely minced
1 tablespoon chopped fresh parsley or cilantro
A pinch of dried oregano
Instructions
1. Prepare the Dough
Add the flour, salt, and baking powder to a large mixing bowl.
Whisk the dry ingredients together so the baking powder and salt are evenly distributed.
Add the yogurt and olive oil or melted butter.
Begin mixing while gradually adding the water.
Don’t add all of the water immediately. Depending on the type of flour and thickness of the yogurt, you may need slightly more or less liquid.
Mix until a soft dough begins to form.
2. Knead the Dough
Transfer the dough to a lightly floured work surface.
Knead for approximately 2–3 minutes, just until the dough becomes smooth and cohesive.
The dough should feel soft and slightly tacky but should not be extremely sticky.
If it feels too wet, add a small amount of flour.
If it feels too dry or cracks easily, add a teaspoon of water at a time until the dough becomes soft.
3. Divide the Dough
Divide the dough into 8–10 equal portions.
Roll each portion into a ball.
Cover the dough balls with a clean kitchen towel and allow them to rest for approximately 3–5 minutes while you heat the skillet.
4. Heat the Skillet
Place a large heavy skillet, cast-iron pan, or nonstick frying pan over medium-high heat.
Allow it to become hot before adding the bread.
You don’t need a large amount of oil. A lightly greased skillet is enough.
5. Roll the Flatbreads
Lightly flour your work surface.
Take one dough ball and roll it into a thin round approximately ⅛–¼ inch thick.
The exact thickness is up to you. Thinner bread cooks faster and develops more browned spots, while slightly thicker bread remains softer and chewier.
Repeat with the remaining dough.
6. Cook the Bread
Place one rolled flatbread onto the hot skillet.
Cook for approximately 1–2 minutes, or until small bubbles begin appearing on the surface and the underside develops golden-brown spots.
Flip the bread.
Cook the second side for another 1–2 minutes.
Press gently with a spatula in areas that are not puffing. This can help the bread cook evenly.
Once golden spots appear on both sides, remove the bread from the skillet.
Repeat with the remaining dough.
7. Add Butter or Garlic Herb Topping
For extra flavor, brush each warm flatbread with melted butter.
For a garlic version, mix melted butter with minced garlic and chopped parsley, then lightly brush it over the cooked bread.
Stack the finished flatbreads on a plate and cover them with a clean kitchen towel. This helps keep them soft and warm.
Notes
The amount of water can vary depending on the flour and yogurt you use. Add it gradually until you have a soft dough.
Plain unsweetened yogurt works best. Greek yogurt can also be used, but because it is thicker, you may need a little additional water.
The dough doesn’t need extensive kneading. A few minutes is enough to bring everything together.
Allowing the dough to rest briefly makes it easier to roll and helps prevent it from springing back.
A properly heated skillet is important. If the pan is too cool, the bread may become dry before it develops attractive golden spots.
Avoid cooking the flatbreads for too long. Overcooking can make them tough rather than soft.
Keep the cooked breads covered with a clean towel as you work through the batch.
Tips for Soft Flatbread
Don’t Use Too Much Flour
Extra flour can make the dough dry and result in tougher bread. Add only enough flour to prevent excessive sticking.
Use Medium-High Heat.
The skillet should be hot enough to cook the bread quickly. If it is smoking heavily, reduce the heat slightly.
Don’t Overwork the Dough
Kneading for several minutes is unnecessary. Once the dough is smooth and cohesive, stop.
Rest the Dough
Even a short resting period makes the dough easier to roll.
Roll Evenly
Try to keep the thickness consistent so each flatbread cooks at the same rate.
Keep Finished Bread Covered
A clean kitchen towel helps trap some steam and keeps the flatbreads soft.
Use Fresh Yogurt
Plain yogurt with a creamy consistency produces a tender dough. Very watery yogurt may require slightly less water.
Flavor Variations
This basic flatbread can be transformed into many different versions.
Garlic Butter Flatbread
Brush the hot bread with melted butter mixed with minced garlic and fresh parsley.
Cheesy Flatbread
Sprinkle shredded mozzarella or cheddar over the bread immediately after flipping it. Cover the skillet briefly to allow the cheese to melt.
Herb Flatbread
Add dried oregano, thyme, rosemary, parsley, or cilantro to the dough.
Spicy Flatbread
Add chili flakes, cayenne pepper, or finely chopped green chili to the dough.
Cumin Flatbread
Add ½ teaspoon ground cumin for a warm, savory flavor that pairs particularly well with curries and grilled meats.
Sesame Flatbread
Sprinkle sesame seeds over the dough before cooking and gently press them into the surface.
Whole-Wheat Version
Replace part of the all-purpose flour with whole-wheat flour. Start by replacing about 1 cup of the flour and adjust the water as needed.
Because whole-wheat flour absorbs more liquid, the dough may require additional water.
Serving Suggestions
These flatbreads are incredibly versatile.
Serve them with hummus, baba ganoush, tzatziki, or other dips.
Use them as a side for chicken curry, chickpea curry, lentils, vegetable curry, or bean dishes.
Serve them alongside grilled chicken, kebabs, steak, or roasted vegetables.
Use them as a wrap for grilled chicken, falafel, vegetables, or scrambled eggs.
They can also be served for breakfast with fried eggs, avocado, cheese, or yogurt.
For a quick snack, spread a warm flatbread with butter and honey.
You can even use the flatbread as a quick pizza base. Add tomato sauce, cheese, and your favorite toppings, then cook covered in a skillet until the cheese melts.
Make-Ahead Instructions
The dough can be prepared several hours ahead of time.
Place the dough in a lightly oiled bowl, cover it tightly, and refrigerate it.
When ready to cook, allow the dough to sit at room temperature for approximately 15–20 minutes before dividing and rolling.
You can also cook the flatbreads ahead of time and reheat them shortly before serving.
Storage
Allow cooked flatbreads to cool completely.
Stack them and store them in an airtight container or resealable bag.
They can be kept at room temperature for approximately 1 day or refrigerated for up to 3 days.
For longer storage, freeze them with pieces of parchment paper between each flatbread.
How to Reheat
For the skillet method, heat each flatbread for approximately 20–30 seconds per side.
You can also wrap several flatbreads in foil and warm them gently in a low oven.
For frozen flatbreads, allow them to thaw and then warm them in a dry skillet.
Avoid overheating because this can make them dry and chewy.
Nutritional Information
Approximate nutrition per serving, based on 10 flatbreads and excluding optional toppings:
Calories: 220
Protein: 6 g
Carbohydrates: 40 g
Fiber: 2 g
Sugar: 2 g
Fat: 4 g
Saturated Fat: 1 g
Cholesterol: 3 mg
Sodium: 280 mg
Nutrition will vary depending on the flour, yogurt, amount of oil, and final size of each flatbread.
Adding butter, cheese, or other toppings will increase the nutritional values.
Benefits
Homemade flatbread allows you to control the ingredients and seasoning compared with many packaged breads.
Yogurt contributes protein and calcium while helping create a soft texture.
Using a skillet instead of an oven makes this recipe convenient for kitchens where an oven isn’t available or when you simply want bread quickly without preheating a large appliance.
The recipe can also be customized with herbs, spices, whole-wheat flour, or other ingredients to fit different meals.
Because this is still a flour-based bread, it is a carbohydrate-rich food. Enjoying it alongside vegetables and a protein source can help create a more balanced meal.
Frequently Asked Questions
Can I make this recipe without baking powder?
Yes, but the flatbreads may be slightly less tender and puffy. Baking powder helps create a lighter texture.
Can I use Greek yogurt?
Yes. Greek yogurt works well, but it is thicker than regular yogurt. Add the water gradually and adjust until the dough reaches the correct consistency.
Can I use whole-wheat flour?
Yes. Replace part of the all-purpose flour with whole-wheat flour. Using 100% whole-wheat flour will produce a denser flatbread and may require additional water.
Why is my flatbread hard?
The most common causes are adding too much flour or cooking the bread for too long. Keep the dough soft and cook the flatbreads quickly over a properly heated skillet.
Why isn’t my bread puffing?
The dough may be too thick, the skillet may not be hot enough, or the dough may not have been rolled evenly. Try using medium-high heat and rolling the bread evenly.
Can I make smaller flatbreads?
Absolutely. Divide the dough into more portions and roll them smaller. Smaller flatbreads are excellent for wraps, appetizers, and lunch boxes.
Can I make the dough without oil?
Yes. The oil contributes tenderness, but you can omit it if necessary. The texture may be slightly less rich.
Can I use milk instead of water?
Yes. Milk can create a slightly richer and softer flatbread. Add it gradually because the amount needed may differ.
Can I add cheese to the dough?
Yes. A small amount of finely shredded cheese can be kneaded into the dough, although cheese may make the bread brown more quickly.
Can I make this gluten-free?
Regular flour contains gluten. A gluten-free flour blend designed for yeast-free flatbreads can be tested as a substitute, but the texture will vary and the liquid amount may need adjustment.
Can I freeze these flatbreads?
Yes. Cool them completely, place parchment between the pieces, and store them in a freezer-safe bag or container for up to approximately 2 months for best quality.
Can I use this as a pizza base?
Yes. Roll the dough slightly thicker, cook one side briefly in the skillet, flip it, add sauce and toppings, cover the pan, and cook until the cheese melts and the bottom is golden.
Final Thoughts
This 10-Minute No-Oven Yogurt Flatbread is one of those simple recipes that is incredibly useful to have in your kitchen. It requires no complicated equipment, no long rising time, and no oven. With flour, yogurt, water, and a few basic ingredients, you can make warm homemade bread directly on the stovetop.
The finished flatbreads are soft in the center, lightly golden on the outside, and perfect for dipping, wrapping, or serving alongside your favorite meals. Add garlic butter and fresh herbs for extra flavor, or keep them simple and let their warm, homemade taste shine.
For the best results, keep the dough soft, avoid adding excessive flour, use a hot skillet, and don’t overcook the bread. Once you make these quick stovetop flatbreads, they may become a regular part of your breakfast, lunch, and dinner routine. 🫓✨