
Classic Homemade Crepes
Prep Time: 10 minutes, plus 20 minutes to rest the batter
Cook Time: 20–25 minutes
Servings: 10–12 crepes
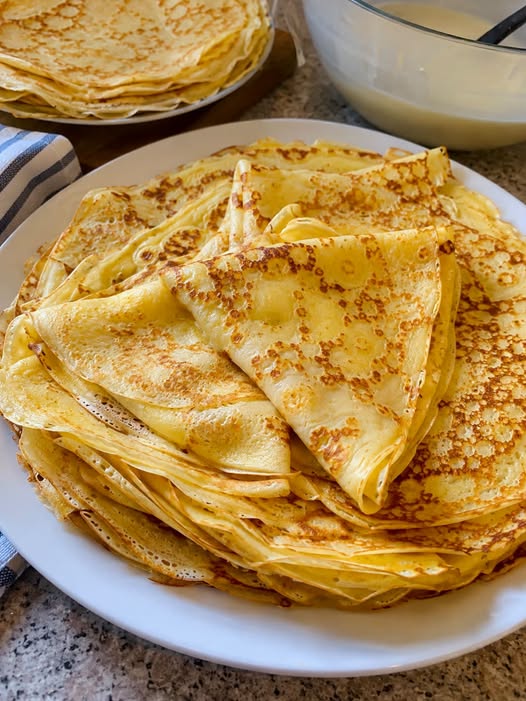
These thin, golden crepes are inspired by the stack in the photo. Their delicate edges and soft centers make them easy to fold into triangles, roll around a filling, or stack on a serving plate. The batter uses everyday ingredients and can be prepared ahead, making crepes a good choice for a relaxed breakfast or brunch.
Unlike thick pancakes, crepes should spread into a very thin layer as soon as the batter hits the pan. A few golden spots give them the lightly browned look shown in the photo. You can keep the flavor simple and serve them with sweet toppings, or leave out the sugar and vanilla for savory fillings.
Ingredients
- 1 cup all-purpose flour
- 2 large eggs
- 1½ cups milk
- 2 tablespoons unsalted butter, melted and slightly cooled
- 1 tablespoon granulated sugar, optional for sweet crepes
- ¼ teaspoon salt
- ½ teaspoon vanilla extract, optional for sweet crepes
- A little extra butter for greasing the pan
Instructions
- Mix the liquid ingredients. Crack the eggs into a large mixing bowl and whisk them until blended. Pour in the milk and whisk again. Starting with the liquid makes it easier to work the flour into a smooth batter.
- Add the dry ingredients. Add the flour, salt, and sugar if you are making sweet crepes. Whisk until you no longer see dry flour. A few tiny lumps are fine, but the batter should pour easily. For a particularly smooth texture, you can blend all the batter ingredients for about 20 seconds instead.
- Add the butter. Whisk in the melted butter and vanilla, if using. The batter should be noticeably thinner than pancake batter. It needs to flow quickly across the pan when you tilt it. If it seems thick, add milk one tablespoon at a time until it reaches a pourable consistency.
- Rest the batter. Cover the bowl and leave it at room temperature for 20 minutes. Resting gives the flour time to absorb the milk. Before cooking, stir the batter gently; a little settling is normal.
- Heat the pan. Place an 8- to 10-inch nonstick skillet over medium heat. Once warm, brush it with a very thin layer of butter. The pan should be hot enough for the batter to begin setting soon after it is poured, but not so hot that it browns before you can spread it.
- Pour and swirl. Lift the pan slightly off the heat. Pour about ¼ cup batter into the center, then immediately tilt and rotate the pan so the batter coats the bottom in a thin layer. Return the pan to the heat. If the first crepe does not cover the pan perfectly, that is fine; use it to judge how much batter your skillet needs.
- Cook the first side. Cook for about 1–2 minutes. The surface should lose its wet shine, and the edges should begin to lift from the pan. Slide a thin spatula underneath to check for light golden spots.
- Flip and finish. Carefully turn the crepe over and cook the second side for about 30–45 seconds. Transfer it to a plate. Repeat with the remaining batter, adding a thin wipe of butter to the pan whenever the crepes begin to stick.
- Stack and serve. Place each finished crepe on top of the previous one. The warmth of the stack helps keep them soft. To copy the presentation in the photo, fold some of the crepes in half and then in half again to form triangles. Arrange them loosely over the stack and serve warm.
Tips
Use the first crepe to adjust the heat. The first one often turns out thicker, paler, or less evenly shaped than the rest. If it browns too quickly, lower the heat slightly. If it stays pale and takes a long time to set, increase the heat a little.
Keep the pan lightly greased. A visible pool of butter can make the batter slide around instead of coating the surface. Wipe a small amount over the pan with a pastry brush or folded paper towel.
Work quickly when swirling. Thin crepes begin to set as soon as they touch the hot skillet. Have your measured batter ready and rotate the pan immediately after pouring.
Check the batter as you cook. Flour can settle at the bottom of the bowl. Give the batter a gentle stir every few crepes. If it thickens while standing, whisk in a small splash of milk.
Keep finished crepes soft. Cover the stack loosely with a clean kitchen towel while cooking the remaining batter. Avoid leaving them uncovered on the counter for a long time, as their thin edges can dry out.
Storage
Allow the crepes to cool before storing them. Stack them in an airtight container or sealable bag, placing small pieces of parchment paper between crepes if you want to separate them easily. Refrigerate for up to 3 days.
To reheat, place one crepe in a warm skillet for a few seconds on each side, or microwave a small stack briefly until warm and flexible. Avoid heating them for too long, which can make the edges dry.
Crepes also freeze well for up to 2 months. Wrap the cooled stack securely and freeze it flat. Thaw in the refrigerator before reheating.
The batter can be made the night before and kept covered in the refrigerator. It may look slightly separated the next day; whisk it gently before using. If it has thickened, add a little milk.
Serving Ideas
For a simple sweet breakfast, fold the warm crepes and add berries, banana slices, jam, or a dusting of powdered sugar. A spoonful of Greek yogurt alongside fruit gives a creamy topping without needing a cooked filling. You can also spread a little chocolate hazelnut spread on each crepe before folding it.
For a savory version, leave the sugar and vanilla out of the batter. Fill the crepes with scrambled eggs and cheese, sautéed mushrooms and spinach, or cooked chicken with a spoonful of creamy sauce. Add the filling just before serving so the crepes do not become soggy.
If you are serving a group, set out a stack of warm crepes and a few bowls of toppings. Everyone can choose a filling and fold their own.
Nutrition Benefits
Eggs and milk contribute protein, while the flour supplies carbohydrates. The small amount of butter helps give the crepes their tender texture. A plain crepe contains approximately 90–110 calories, depending on its size and the amount of butter used in the pan. Fruit, yogurt, cheese, and other fillings will change the nutrition of a finished serving.
Q&A
Why are my crepes thick instead of thin?
The batter may be too thick, or you may be pouring too much into the skillet. Whisk in a splash of milk and use just enough batter to cover the pan as you swirl it.
Why do my crepes tear when I flip them?
They may need a little more time on the first side. Wait until the surface looks set and the edges lift easily, then use a thin spatula to loosen the crepe before turning it.
Can I make the crepes without sugar?
Yes. Sugar is optional. Leave it out for savory crepes or if you plan to serve them with a sweet filling.
Do I need a special crepe pan?
No. A regular nonstick skillet works well. An 8- to 10-inch pan is easy to lift and tilt, which helps the batter spread evenly.