
No-Bake Chocolate Peanut Butter Oatmeal Bars
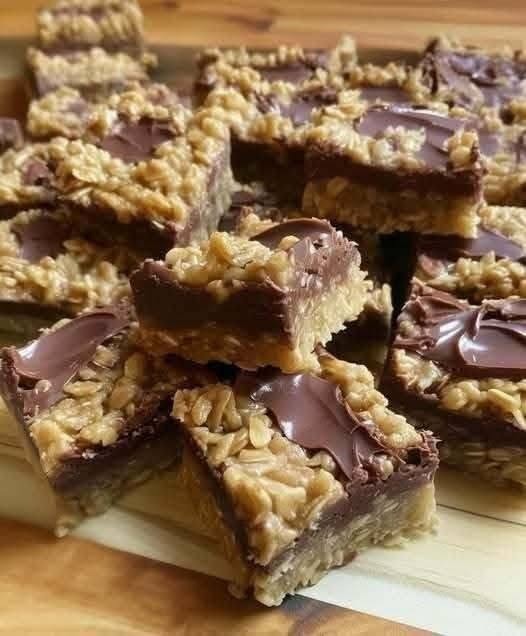
These No-Bake Chocolate Peanut Butter Oatmeal Bars are rich, chewy, creamy, and incredibly satisfying. Based on the image, they feature a buttery oat layer, a smooth chocolate-peanut butter filling, and a crumbly oat topping with extra melted chocolate.
They are easy to prepare without turning on the oven and make a wonderful dessert, afternoon snack, lunchbox treat, or make-ahead sweet bite. The combination of hearty oats, creamy peanut butter, and rich chocolate creates an irresistible texture that is crunchy, chewy, and fudgy all at once.
The recipe below is inspired by the style and appearance of the bars in your image.
Recipe Information
- Recipe Name: No-Bake Chocolate Peanut Butter Oatmeal Bars
- Prep Time: 15 minutes
- Cook Time: 10 minutes
- Chilling Time: 2–3 hours
- Total Time: About 2 hours 25 minutes
- Servings: 12–16 bars
Ingredients
For the Oat Layers
- ¾ cup unsalted butter
- ⅓ cup brown sugar, packed
- 1 teaspoon vanilla extract
- 2½ cups quick-cooking oats
- ¼ teaspoon salt
For the Chocolate Peanut Butter Filling
- ¾ cup semi-sweet chocolate chips
- ½ cup creamy peanut butter
Optional Toppings
- Extra melted chocolate
- Chocolate chunks
- Chopped peanuts
- Flaky sea salt
- Mini chocolate chips
Instructions
Step 1: Prepare the Pan
Line an 8×8-inch square baking pan with parchment paper.
Leave some parchment paper hanging over the sides. This will make it much easier to lift the bars out after they have chilled.
Set the pan aside.
Step 2: Make the Oat Mixture
Place a large saucepan over low to medium-low heat.
Add the butter and allow it to melt completely.
Once melted, add the brown sugar and stir until the sugar is well combined with the butter.
Add the vanilla extract and salt.
Now add the quick-cooking oats.
Stir everything together until all the oats are evenly coated in the buttery mixture.
Continue cooking over low heat for approximately 3 to 5 minutes, stirring regularly.
The goal is not to fry or brown the oats heavily. You simply want them to absorb the buttery mixture and become soft and flavourful.
Remove the pan from the heat.
Step 3: Create the Bottom Layer
Divide the oat mixture roughly in half.
Transfer one half into your prepared baking pan.
Use the back of a spoon, spatula, or measuring cup to press the oats firmly into an even layer.
This step is important.
If the bottom layer is too loose, the finished bars may crumble when sliced.
Press firmly enough to create a solid base, but don’t worry about making it perfectly smooth.
Set the remaining oat mixture aside for the top layer.
Step 4: Make the Chocolate Peanut Butter Filling
In a separate saucepan or microwave-safe bowl, combine:
- Semi-sweet chocolate chips
- Creamy peanut butter
Stovetop Method
Heat over very low heat, stirring continuously until the chocolate melts and the mixture becomes smooth.
Remove from the heat immediately once melted.
Microwave Method
Microwave the chocolate and peanut butter in short 20-second intervals.
Stir after each interval.
Continue until smooth.
Be careful not to overheat the chocolate.
The finished filling should be glossy, creamy, and easy to spread.
Step 5: Add the Chocolate Layer
Pour the melted chocolate peanut butter mixture over the pressed oat base.
Use a spatula to spread it evenly across the entire surface.
Make sure the chocolate reaches the corners of the pan.
For an extra chocolatey version, reserve a few tablespoons of the chocolate mixture for drizzling over the finished bars.
Step 6: Add the Top Oat Layer
Take the remaining oat mixture and gently crumble it over the chocolate layer.
Try to distribute it evenly across the top.
Unlike the bottom layer, do not press the top layer too firmly.
A light press is enough to help the oats stick to the chocolate while maintaining the beautiful crumbly texture shown in the image.
Add a few extra chocolate chunks or chips on top if desired.
You can also drizzle the reserved melted chocolate over the surface.
Step 7: Chill the Bars
Cover the pan and place it in the refrigerator.
Chill for at least 2 to 3 hours, or until the chocolate layer has become firm.
For faster chilling, you can place the pan in the freezer for approximately 45 to 60 minutes.
However, avoid freezing the bars for too long before slicing because the chocolate can become extremely hard.
Step 8: Slice and Serve
Once the bars are firm, lift them out of the pan using the parchment paper.
Place them on a cutting board.
Allow them to sit at room temperature for approximately 10 minutes if they are very cold.
Use a sharp knife to cut them into squares or rectangular bars.
For cleaner slices, run the knife under warm water and wipe it dry between cuts.
Serve and enjoy! 🍫🥜
What Do These Bars Taste Like?
These bars have several delicious layers of texture and flavour.
The oat layers are:
- Buttery
- Chewy
- Slightly crumbly
- Sweet and comforting
The centre is:
- Rich
- Creamy
- Chocolatey
- Packed with peanut butter flavour
Together, the combination tastes similar to a cross between a chocolate peanut butter fudge bar, granola bar, and oatmeal cookie.
Recipe Notes
Use the Right Type of Oats
Quick-cooking oats work especially well because they create a softer and more compact bar.
Old-fashioned rolled oats can also be used, but they will produce a chewier and slightly rougher texture.
If you prefer the texture shown in the image, quick oats are a great choice.
Choose Good-Quality Chocolate
Because chocolate is the star of the filling, choose chocolate that you enjoy eating on its own.
You can use:
- Semi-sweet chocolate
- Dark chocolate
- Milk chocolate
Dark chocolate will make the bars less sweet, while milk chocolate will create a sweeter and creamier dessert.
Natural Peanut Butter vs. Regular Peanut Butter
Creamy regular peanut butter generally produces a smooth and stable filling.
Natural peanut butter can also work, but make sure it is stirred thoroughly before measuring because separated oil can affect the texture.
Tips for the Best Oatmeal Bars
1. Press the Bottom Layer Firmly
The bottom layer needs to support the chocolate filling.
Use the bottom of a glass or measuring cup to press the oats firmly into the pan.
This helps prevent the bars from falling apart.
2. Don’t Overcook the Oats
Keep the heat low.
Cooking the oats for too long can make the mixture dry and cause the finished bars to become crumbly.
The oats only need a few minutes to absorb the butter and sugar.
3. Melt the Chocolate Gently
Chocolate can burn quickly.
Use low heat or short microwave intervals.
Always stir frequently.
4. Chill Completely Before Cutting
This is one of the most important steps.
If you try to slice the bars before the chocolate has set, the filling may ooze out and create messy pieces.
Patience creates clean, beautiful bars!
5. Use a Warm Knife
For neat slices, warm your knife under hot water.
Dry it completely and slice through the bars.
Repeat as necessary.
The warm blade moves through the chocolate layer much more easily.
Delicious Variations
Peanut Crunch Version
Add ½ cup chopped peanuts to the oat mixture.
This gives the bars extra crunch and a stronger nutty flavour.
Salted Chocolate Version
Sprinkle a small amount of flaky sea salt over the melted chocolate.
The salty flavour balances the sweetness beautifully.
Coconut Version
Add ½ cup shredded coconut to the oat mixture.
Coconut pairs wonderfully with chocolate and peanut butter.
Protein Version
For a more protein-focused snack, add a small amount of your favourite peanut butter-flavoured protein powder.
You may need to add a little extra peanut butter or a small splash of milk if the mixture becomes too dry.
Nut-Free Version
Replace peanut butter with:
- Sunflower seed butter
- Cookie butter, if suitable for your dietary needs
- Another preferred seed or nut butter
The flavour will change slightly, but the bars can still be delicious.
Servings
This recipe makes approximately the following:
12 large bars
or
16 smaller squares
The smaller squares are perfect for snacks, dessert trays, and lunchboxes.
Approximate Nutritional Information
Nutrition values are estimates and will vary depending on the brands and ingredients used.
Per Bar, Based on 16 Servings
- Calories: Approximately 210–250 kcal
- Protein: 4–6 g
- Carbohydrates: 20–26 g
- Fat: 13–17 g
- Fibre: 2–3 g
- Sugar: 12–17 g
If you make larger bars, the nutritional values per serving will be higher.
Benefits of This Recipe
Provides Energy
Oats contain complex carbohydrates, making these bars a satisfying snack option.
Contains Fiber
Oats naturally provide dietary fibre, which contributes to the filling nature of the recipe.
Contains Healthy Fats
Peanut butter provides fats and some protein, helping make the bars more satisfying than a simple candy-style dessert.
Easy to Make Ahead
These bars are excellent for meal preparation.
Make a batch, refrigerate it, and enjoy portions throughout the week.
No Oven Required
This recipe is especially convenient during warm weather or when you want a quick dessert without baking.
Storage Instructions
Refrigerator
Store the bars in an airtight container in the refrigerator.
They will keep well for approximately 5 to 7 days.
Place parchment paper between layers if stacking them.
Freezer
These bars can also be frozen.
Wrap individual bars or store them in a freezer-safe container.
Freeze for up to 2 months.
Allow them to thaw in the refrigerator or at room temperature before eating.
Frequently Asked Questions
Can I use old-fashioned rolled oats?
Yes.
Rolled oats will create a chewier and more textured bar. Quick oats produce a softer and more compact result.
Can I make these without peanut butter?
Yes. You can substitute almond butter, cashew butter, sunflower seed butter, or another creamy alternative.
Why are my bars falling apart?
The most common reasons are:
- The bottom oat layer wasn’t pressed firmly enough.
- The oat mixture was too dry.
- The bars weren’t chilled long enough.
- They were cut while still warm.
Make sure to press the base firmly and chill completely.
Can I use milk chocolate?
Absolutely!
Milk chocolate creates a sweeter and creamier filling.
If you prefer a richer flavour, use dark or semi-sweet chocolate.
Can I reduce the sugar?
Yes.
You can reduce the brown sugar slightly, although the oat mixture may become less sweet.
You can also experiment with maple syrup or another sweetener, but changing the ingredients may affect how firmly the bars set.
Are these gluten-free?
They can be made gluten-free by using certified gluten-free oats and checking that all other ingredients are suitable for your dietary needs.
Can I add protein powder?
Yes, but add it gradually.
Protein powder can absorb moisture and make the mixture dry or crumbly.
If necessary, add a little additional peanut butter to maintain a good texture.
Final Thoughts
These No-Bake Chocolate Peanut Butter Oatmeal Bars are a simple yet irresistible treat that combines three classic ingredients: oats, peanut butter, and chocolate.
The buttery oat layers create a delicious chewy base, while the smooth chocolate-peanut butter centre adds richness and creaminess. Finished with a crumbly oat topping and extra chocolate, these bars look impressive but require very little effort.
They are perfect for making ahead for family snacks, parties, lunchboxes, or whenever you need a quick homemade dessert.