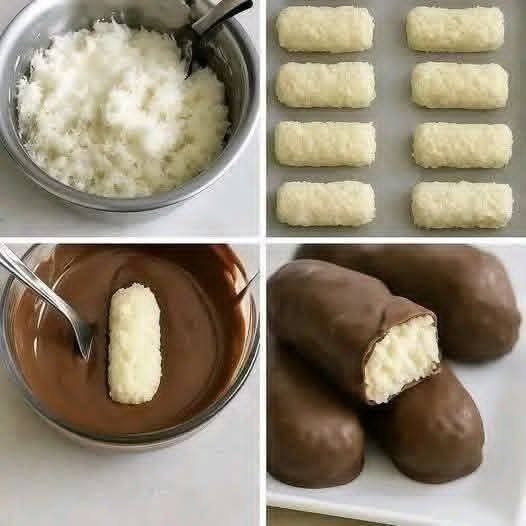

Chocolate Coconut Bars: Easy No-Bake Bounty-Style Treats
Prep Time: 25 minutes
Cook Time: 5 minutes for melting chocolate
Chill Time: 1 hour 20 minutes
Total Time: 1 hour 50 minutes
Servings: 12 bars
Method: No-bake
Category: Dessert
Easy chocolate coconut bars combine a soft coconut filling with a crisp chocolate coating. Inspired by the bars pictured, this homemade version uses unsweetened coconut, thick coconut cream, and a powdered sugar substitute for a treat you can prepare without turning on the oven.
Each bite delivers a rich coconut center surrounded by smooth chocolate. The ingredients are simple, and most of the preparation time is spent waiting for the bars to firm up in the refrigerator or freezer.
Unlike traditional versions made with sweetened condensed milk, these bars use coconut cream and coconut oil to bind the filling. Choose chocolate and sweetener according to your preferences. They are not zero-carb, and their sugar content depends on the products you use.
Ingredients Easy Chocolate Coconut Bars
For the Coconut Filling
2 cups finely shredded unsweetened coconut, approximately 160 g
½ cup thick, unsweetened coconut cream, approximately 120 g
3 tablespoons powdered erythritol or a powdered erythritol–monk fruit blend, adjusted to taste
2 tablespoons coconut oil, melted and slightly cooled
1 teaspoon vanilla extract
⅛ teaspoon salt
For the Chocolate Coating
7 ounces sugar-free dark chocolate, approximately 200 g, chopped
2 teaspoons coconut oil
Ingredient note: Use a powdered sweetener intended to replace sugar approximately measure for measure. Concentrated monk fruit or stevia requires much smaller quantities. Choose thick coconut cream rather than coconut milk beverage or sweetened cream of coconut.
Instructions Easy Chocolate Coconut Bars
Step 1: Prepare Your Tray
Line a small baking tray or flat plate with parchment paper. Choose something that fits inside your freezer with enough space to keep the bars level.
Set out a mixing bowl, spatula, tablespoon, and two forks. Having everything ready makes shaping and dipping easier, especially once the chocolate is melted.
Step 2: Mix the Coconut Filling
Add the shredded coconut, thick coconut cream, powdered sweetener, melted coconut oil, vanilla, and salt to the bowl.
Stir thoroughly, pressing the mixture against the sides of the bowl so the coconut becomes evenly moistened. Let it stand for 5 minutes, allowing the coconut to absorb some moisture.
The filling should hold together when firmly squeezed. It should feel moist and compact, without liquid collecting at the bottom of the bowl.
Step 3: Adjust the Texture
If the mixture crumbles when pressed, add another teaspoon of coconut cream. Mix well before adding more; a little extra liquid can make a noticeable difference.
If it feels loose or overly wet, stir in another tablespoon of shredded coconut. Refrigerate for 10–15 minutes if the coconut oil is warm and the mixture feels greasy.
Taste the filling and adjust the sweetness before shaping.
Step 4: Shape the Bars
Divide the coconut mixture into 12 equal portions.
Squeeze each portion firmly between your hands, then shape it into a short rectangle with rounded corners. Aim for bars approximately 2½ inches long, although even thickness matters more than exact dimensions.
Place them on the lined tray with a little space between each one. Press down any loose coconut strands so the surfaces are reasonably smooth.
Step 5: Freeze Until Firm
Freeze the shaped bars for 30–40 minutes, or until they feel firm enough to lift without bending or breaking.
This step helps the filling stay together during dipping. Soft bars can crumble into warm chocolate, making the coating difficult to manage.
They should be thoroughly chilled, but they do not need to remain in the freezer for hours.
Step 6: Melt the Chocolate
Place the chopped chocolate and 2 teaspoons coconut oil in a completely dry microwave-safe bowl.
Microwave in 20-second intervals, stirring well between each interval. Stop heating when a few small pieces remain, then stir until smooth.
Alternatively, melt the chocolate in a heatproof bowl over barely simmering water. Keep the bowl above the water and prevent steam or droplets from getting into the chocolate.
Allow it to cool slightly while remaining fluid.
Step 7: Coat Each Coconut Bar
Take a few bars from the freezer at a time, leaving the others chilled.
Lower one bar into the melted chocolate. Use a fork to turn it gently, or spoon chocolate over the top until covered.
Lift it with the fork and lightly tap the fork against the bowl to remove excess coating. Use a second fork to slide the bar onto the parchment.
Repeat with the remaining bars.
Step 8: Chill and Serve
Refrigerate the coated bars for approximately 30–40 minutes, until the chocolate is firm.
If you have leftover melted chocolate, drizzle it over the tops before chilling for a simple decorative finish.
Serve chilled for a firmer bite. For a softer coconut center, let a bar stand at room temperature for about 5 minutes before eating.
Tips for Easy Chocolate Coconut Bars
Choose finely shredded coconut. Large flakes create a rougher filling that is harder to compact. If necessary, pulse the coconut briefly in a food processor without grinding it into a paste.
Use thick coconut cream. A watery product can leave the filling too soft. If using a separated can, scoop out the thick portion and stir it smooth before measuring.
Use powdered sweetener. Granulated erythritol may remain gritty because this filling is not cooked. Powdered sweetener blends more evenly.
Compact the mixture firmly. The bars need pressure to hold their shape. Loosely formed coconut rectangles are more likely to break during dipping.
Keep water away from chocolate. Even a small amount can make melted chocolate seize and become thick or grainy.
Dip in small batches. Taking all the bars out at once gives them time to soften. Working with three or four at a time makes coating easier.
Recipe Notes and Variations
Using Regular Dark Chocolate
You can substitute regular dark chocolate if avoiding sugar is not your goal. Choose a variety you enjoy eating on its own, since its flavor will be prominent.
This substitution changes the sugar and carbohydrate content.
Adjusting the Sweetness
Dark chocolate can taste quite bitter against a lightly sweetened filling. Taste both components before assembling and adjust the filling to suit your preference.
Avoid replacing powdered sweetener with a generous amount of liquid sweetener without adjusting the other ingredients, because additional liquid changes the texture.
Making Coconut Bites for Easy Chocolate Coconut Bars
Instead of rectangles, roll the mixture into 24 small balls. Chill and dip as directed.
Smaller bites work well for dessert platters and give you more individual portions from the same batch.
Adding an Almond Center
Press one roasted almond into each coconut portion before shaping. Seal the filling around it so the almond stays inside during dipping.
This variation adds crunch and introduces a tree nut allergen.
Storage Easy Chocolate Coconut Bars
Refrigerator: Store the bars in an airtight container for up to 5 days. Separate stacked layers with parchment paper to prevent sticking.
Freezer: Freeze in a sealed container for up to 2 months for best quality. Once the coating is firm, you can wrap bars individually before placing them in the container.
To serve from frozen: Transfer a bar to the refrigerator until the filling softens, or let it stand briefly at room temperature.
Keep the bars chilled until needed, especially in warm weather. Coconut oil softens readily, and the coating can become messy.
Serving Ideas for Easy Chocolate Coconut Bars
Serve these homemade chocolate coconut bars with coffee, unsweetened tea, or a small bowl of fresh berries.
For a dessert platter, cut chilled bars in half to reveal the white coconut center. Use a sharp knife warmed in hot water and wiped completely dry between cuts.
They also make a convenient dessert to prepare ahead. Store individual portions in small containers for easy serving throughout the week.
Estimated Nutritional Information for
Per bar, based on 12 servings:
Calories: Approximately 240–270
Fat: Approximately 23–26 g
Protein: Approximately 2–3 g
Fiber: Approximately 3–5 g
Carbohydrates and sugars: These vary considerably with the chocolate and sweetener. Calculate them from your product labels for an accurate result. Sugar alcohols and fiber are reported differently across products and countries, so a single reliable net-carb figure cannot be supplied without those details.
Make Everyday Cooking Easier
Discover 60+ high-protein, low-carb recipes with simple instructions and everyday ingredients. Explore breakfasts, lunches, dinners, salads, and snacks—plus a 30-day meal plan to help you plan ahead.
Get the Elite Protein Kitchen Cookbook
Recipe Benefits for Easy Chocolate Coconut Bars
This recipe requires no baking and uses a short ingredient list. You can adjust the sweetness, choose your preferred chocolate, and make the bars ahead of time.
Unsweetened coconut contributes fiber and texture. However, coconut, coconut cream, and chocolate also make these bars energy-dense and relatively high in saturated fat. Enjoy them as a portioned dessert; they do not cause weight loss or remove excess body water.
Frequently Asked Questions
Are these chocolate coconut bars zero-carb?
No. Coconut and chocolate contain carbohydrates, even when no sugar is added.
Can I call them sugar-free?
Only if the finished recipe meets the relevant criteria. Using sugar-free chocolate does not automatically make the whole recipe sugar-free because other ingredients can contain naturally occurring sugars.
Why is my filling falling apart?
It may be too dry, insufficiently compressed, or not chilled enough. Add coconut cream a teaspoon at a time if needed, press firmly, and chill again.
Can I use coconut milk instead of coconut cream?
Thin coconut milk is not a direct substitute. The thick solid portion from a chilled can of full-fat coconut milk may work, but adjust gradually.
Why is the coating so thick?
The chocolate may have cooled too much. Rewarm gently in short intervals and stir. Avoid adding water to thin it.
Can I make these dairy-free?
Yes, provided the chocolate and every other ingredient are dairy-free. Check labels carefully.


Pingback: Slow Cooker Pot Roast with Carrots and Onions 2026