
Fluffy Japanese Cotton Cheesecake
Japanese cotton cheesecake has the creamy flavor of cheesecake and the airy texture of a soft sponge cake. Its height comes from whipped egg whites folded into a smooth cream cheese batter. A gentle water bath helps it bake evenly, leaving a lightly golden top and a tender center.
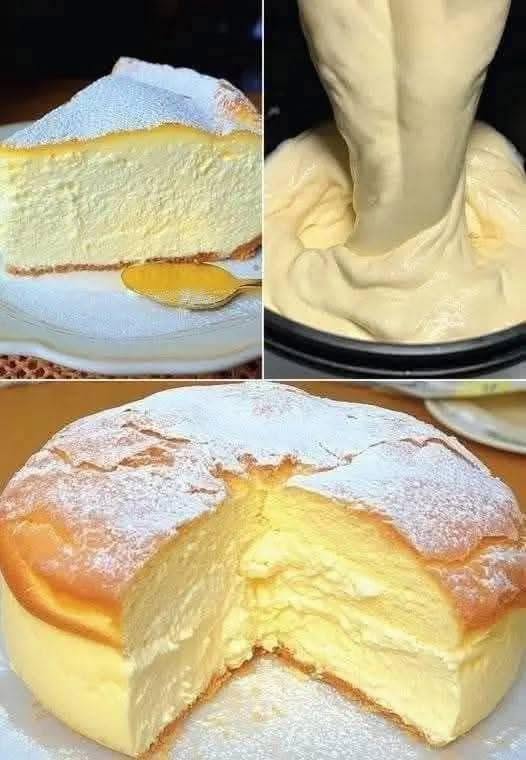
The cake in the photo is tall and pale, with powdered sugar on top and a soft interior. This recipe is designed to produce that style of cheesecake. It tastes delicious at room temperature, when its texture is especially fluffy, or chilled, when it becomes slightly firmer.
Prep Time: 30 minutes
Cook Time: 70–80 minutes
Cooling Time: About 1 hour
Servings: 10
Ingredients
9 oz (250 g) cream cheese, softened
¼ cup (60 g) unsalted butter
⅓ cup plus 1 tablespoon (100 ml) milk
6 large eggs, separated
½ cup (60 g) all-purpose flour
2½ tablespoons (20 g) cornstarch
½ cup plus 1 tablespoon (120 g) granulated sugar
1 tablespoon lemon juice
1 teaspoon vanilla extract
¼ teaspoon salt
Powdered sugar, for serving
Instructions
Step 1: Prepare the oven and pan. Preheat the oven to 320°F (160°C). Line the bottom of an 8-inch round cake pan with parchment paper. Line the sides with a tall strip of parchment that extends slightly above the rim; this gives the cake room to rise. A solid-bottom pan is easiest for water-bath baking. If using a pan with a removable bottom, wrap the outside securely in several layers of foil to reduce the chance of water leaking in.
Step 2: Set up the water bath. Choose a roasting pan large enough to hold the cake pan without their sides touching. Set the roasting pan aside for now. You will add hot water after the batter is in the cake pan, immediately before baking.
Step 3: Melt the cream cheese mixture. Put the softened cream cheese, butter, and milk in a heatproof bowl. Place it over a saucepan of barely simmering water, making sure the bottom of the bowl does not touch the water. Stir gently until the butter melts and the mixture looks smooth. Remove the bowl from the heat and let it cool until warm rather than hot.
Step 4: Add the egg yolks and flavorings. Separate the eggs carefully, placing the whites in a large, clean bowl. Whisk the yolks into the warm cream cheese mixture one at a time. Add the lemon juice and vanilla extract and stir until combined.
Step 5: Add the dry ingredients. Sift the flour and cornstarch over the cream cheese mixture. Whisk gently until there are no visible lumps. Avoid beating vigorously; you want a smooth batter, while the whipped whites added later will provide the airiness.
Step 6: Whip the egg whites. Add the salt to the bowl of egg whites. Beat with an electric mixer until they look foamy. Add the granulated sugar gradually while continuing to beat. Stop when the whites form soft to medium peaks: when you lift the beaters, the tip should bend over slightly. Whites beaten until stiff and dry are more difficult to fold into the batter.
Step 7: Fold the batters together. Add about one-third of the whipped whites to the cream cheese batter. Fold gently with a spatula to lighten it. Add the remaining whites in two portions. Sweep the spatula down through the center and up from the bottom, turning the bowl as you work. Continue only until the mixture looks even, with no large white streaks.
Step 8: Fill the pan. Pour the batter into the prepared cake pan. Run a spatula gently through it once to release any large trapped air pockets, then tap the pan lightly on the counter once or twice. Do not repeatedly bang the pan, which can remove too much of the air you just folded in.
Step 9: Bake in the water bath. Place the cake pan inside the roasting pan. Carefully pour hot water into the roasting pan until it reaches about 1 inch up the outside of the cake pan. Transfer it to the oven and bake for 70–80 minutes. The top should be lightly golden. When you gently move the pan, the center should wobble slightly as one piece rather than ripple like liquid.
Step 10: Cool gradually. Turn off the oven and leave the cheesecake inside for 20 minutes with the oven door slightly open. Then remove the cake pan from the water bath and let it cool further on a rack. Once it is cool enough to handle, carefully loosen the parchment and remove the cake from the pan.
Step 11: Finish and serve. Let the cheesecake cool completely before slicing. Dust the top with powdered sugar just before serving. Use a clean knife for each cut so the soft slices keep their shape.
Tips
Use a clean bowl for the whites. Even a little grease or egg yolk can make egg whites harder to whip. Separate the eggs one at a time into a small bowl before adding each white to the large mixing bowl. That way, one broken yolk will not affect the entire batch.
Let the cheese mixture cool before adding eggs. It should still be fluid and easy to mix, but it must not be so hot that it cooks the yolks. A warm mixture also folds more readily into the whipped whites than a cold, firm one.
Watch the peaks closely. The whites should hold their shape while remaining smooth and flexible. If they look clumpy or dry, they have been beaten too far. Soft to medium peaks blend more evenly into the cream cheese mixture and help create a fine, fluffy crumb.
Fold with a light hand. Stirring hard will knock air out of the batter. Reach down to the bottom of the bowl with the spatula; thicker batter can hide there even when the top looks combined. Stop as soon as the color is even.
Check your oven. An oven that runs hot may brown the surface before the center finishes baking. If the top darkens too quickly, loosely place foil over the cake without letting it touch the surface. Keep the oven door closed as much as possible during the main baking time.
Expect a little shrinkage. This cake rises in the oven and settles somewhat as it cools. Gradual cooling helps it keep more of its height, but a small change is normal for such an airy cake.
Storage
Cover the completely cooled cheesecake and refrigerate it for up to 3 days. Keep powdered sugar off portions you plan to store, since it can dissolve against the cake’s moist surface. Dust each slice just before serving instead.
For a soft, fluffy texture, leave a refrigerated slice at room temperature for about 15–20 minutes before eating. Serve it chilled if you prefer a denser, creamier texture. Store leftovers promptly after serving.
Serving Ideas
A light dusting of powdered sugar is enough to finish this cheesecake, as shown in the photo. Serve it on its own to appreciate its delicate cream cheese flavor. Fresh berries can add color and a little tartness without covering the cake’s soft texture.
For neat portions, cut the cake with a thin knife, wiping the blade between slices. The cake is delicate, so lift each slice with a cake server rather than pulling it from the platter by hand.
Nutrition Benefits
Eggs and cream cheese provide protein, while flour, sugar, and butter give the cake its structure and dessert flavor. Estimated nutrition: about 260 calories per slice when divided into 10 portions. The exact amount depends on the products used and the size of each slice.
Q&A
Why did my cheesecake crack?
The oven may have been too hot, the egg whites may have been whipped too stiffly, or the cake may have cooled too quickly. Use a gentle water bath and allow it to cool gradually.
Why did the cake sink?
A little settling is normal. Significant sinking can happen if the batter loses too much air during folding or if the center has not baked long enough.
How do I know when it is done?
The top should look set and lightly golden. The center can wobble gently when moved, but it should not look liquid.
Can I skip the water bath?
The water bath is strongly recommended. It helps the cake bake gently and evenly, which supports the soft texture shown in the photo